Túngara model – now with sound!

Sound on!!

A while ago, I crocheted a túngara, a frog I hear a lot during the wet season in Panamá. I wanted to have my model make the distinctive túngara call, which sounds like a video game sound effect, but I didn’t know how. For Christmas, Andrew gave me a bunch of cool electronics that I can record on and embed in soft toys. He even loaded one with a recording of a túngara for me!

We opened the frog up and inserted the device.

Here’s a picture of a real túngara with its characteristic inflated dewlap.

I’m looking forward to making more noisy toys like this! Someone suggested a toucan, which should be fun.

I live in Panamá now!

Hey everyone, long time no post! My husband and I have been pretty busy moving to the Panamanian rainforest, near the Smithsonian Tropical Research Institute in Gamboa. I hope that my yarn will show up someday, but until then, I’m focusing on plarncrafting! The house we bought came with its own hammock, so I made a cushion for that…

And I’m also thinking about other housewares I could make with plarn, like this little bowl for loose change.

If you come visit us in Panamá, bring me your spare plastic bags! Or just yarn 😉

Make your own bioluminescent dinoflagellate!

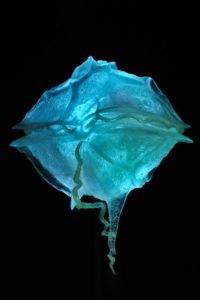
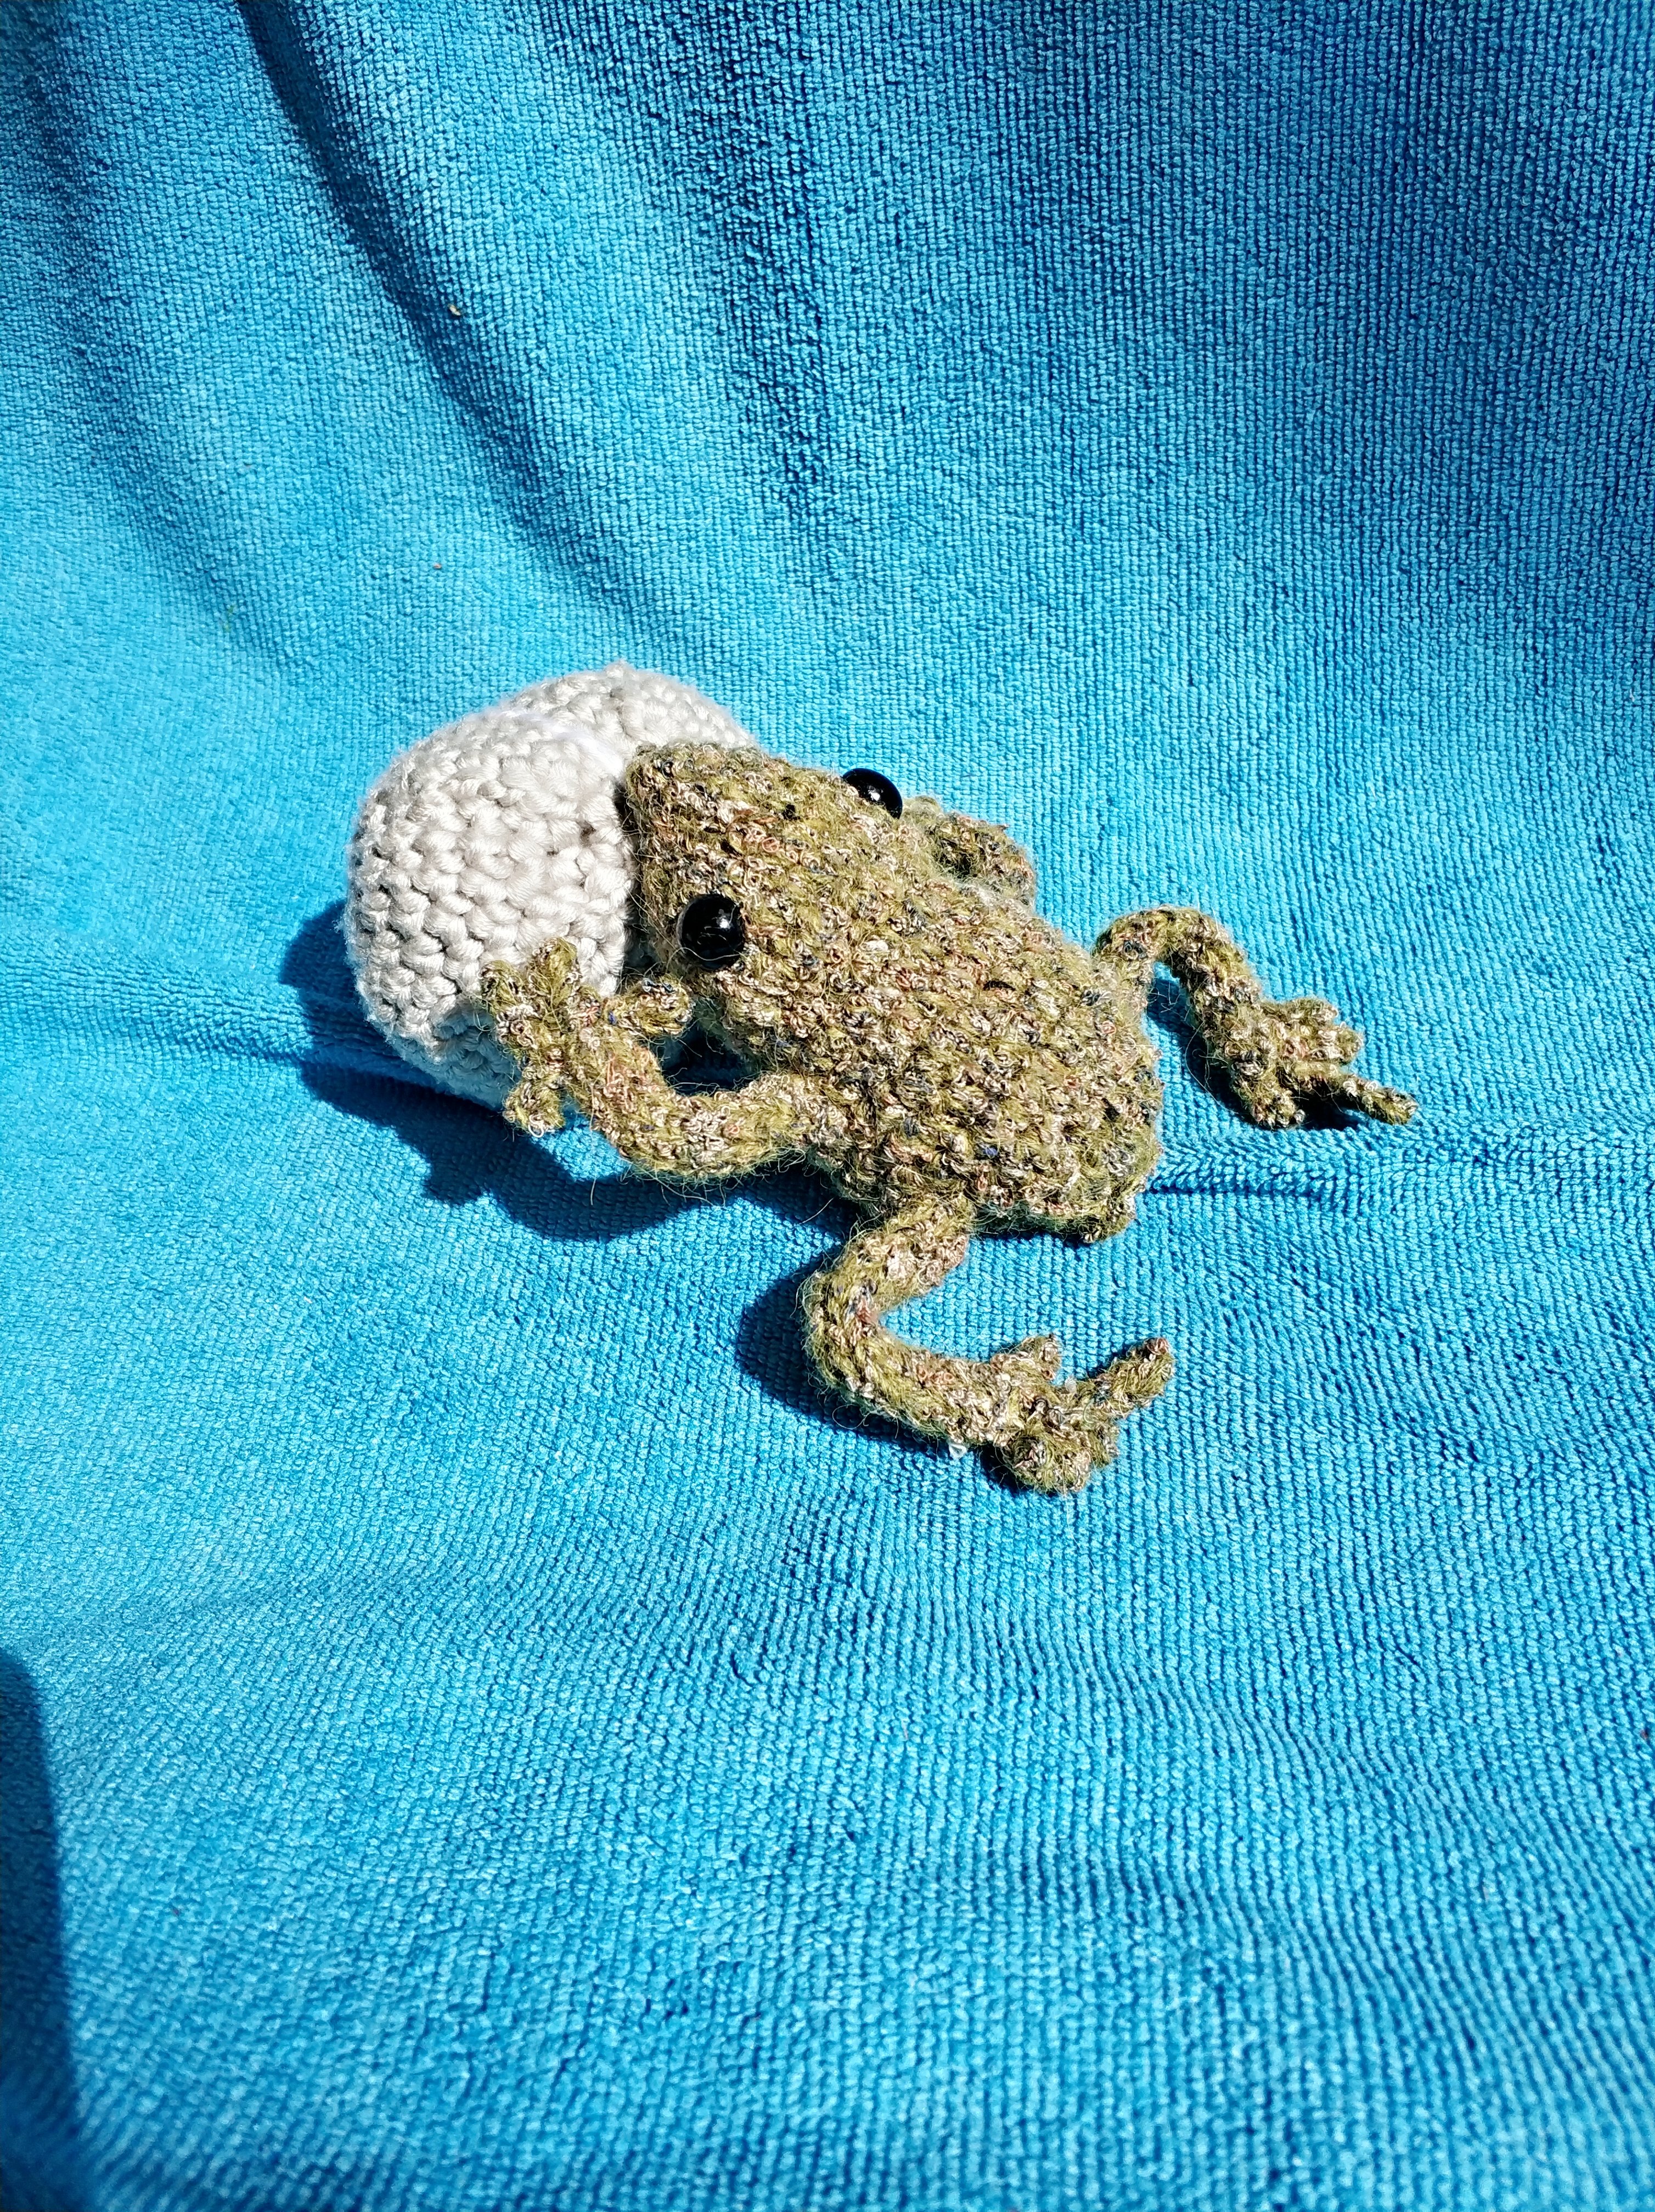
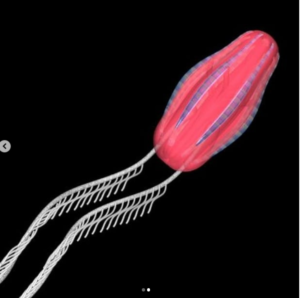
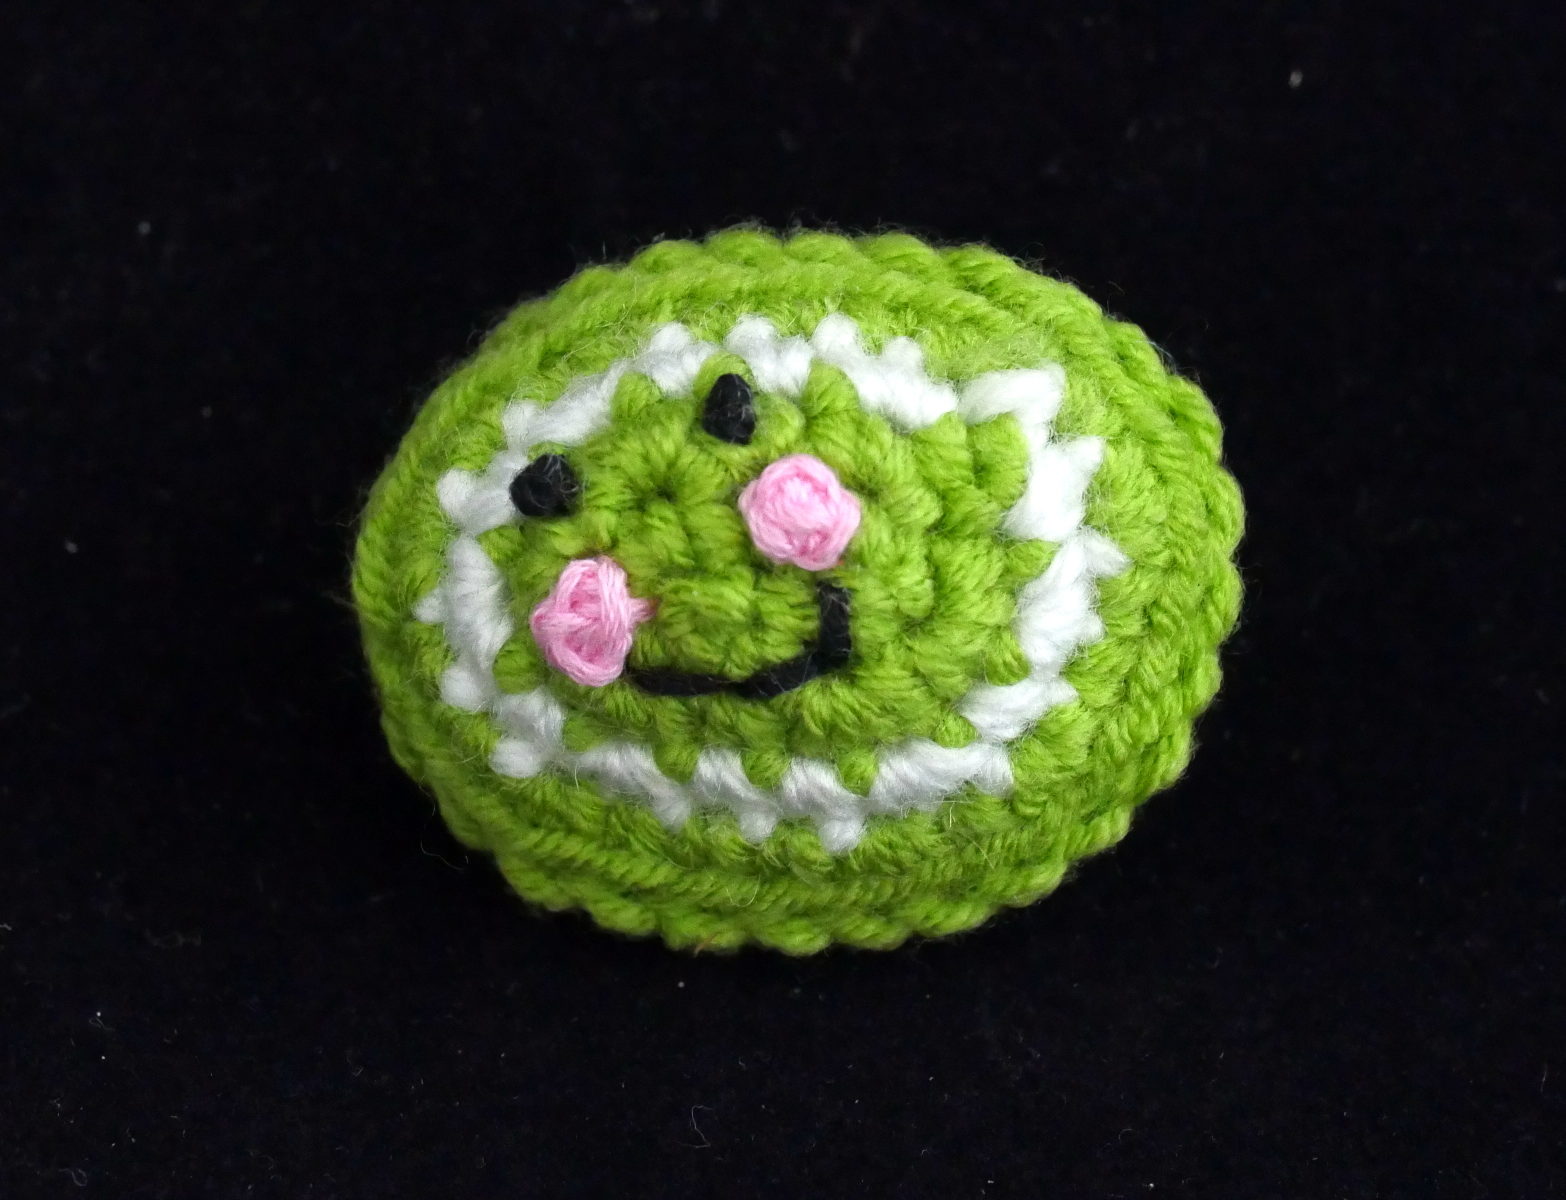
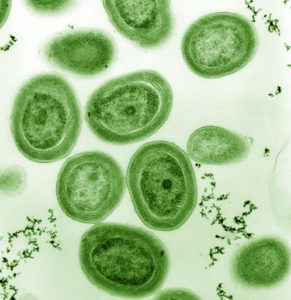
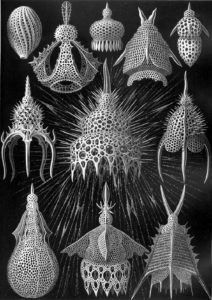
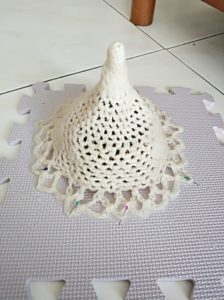
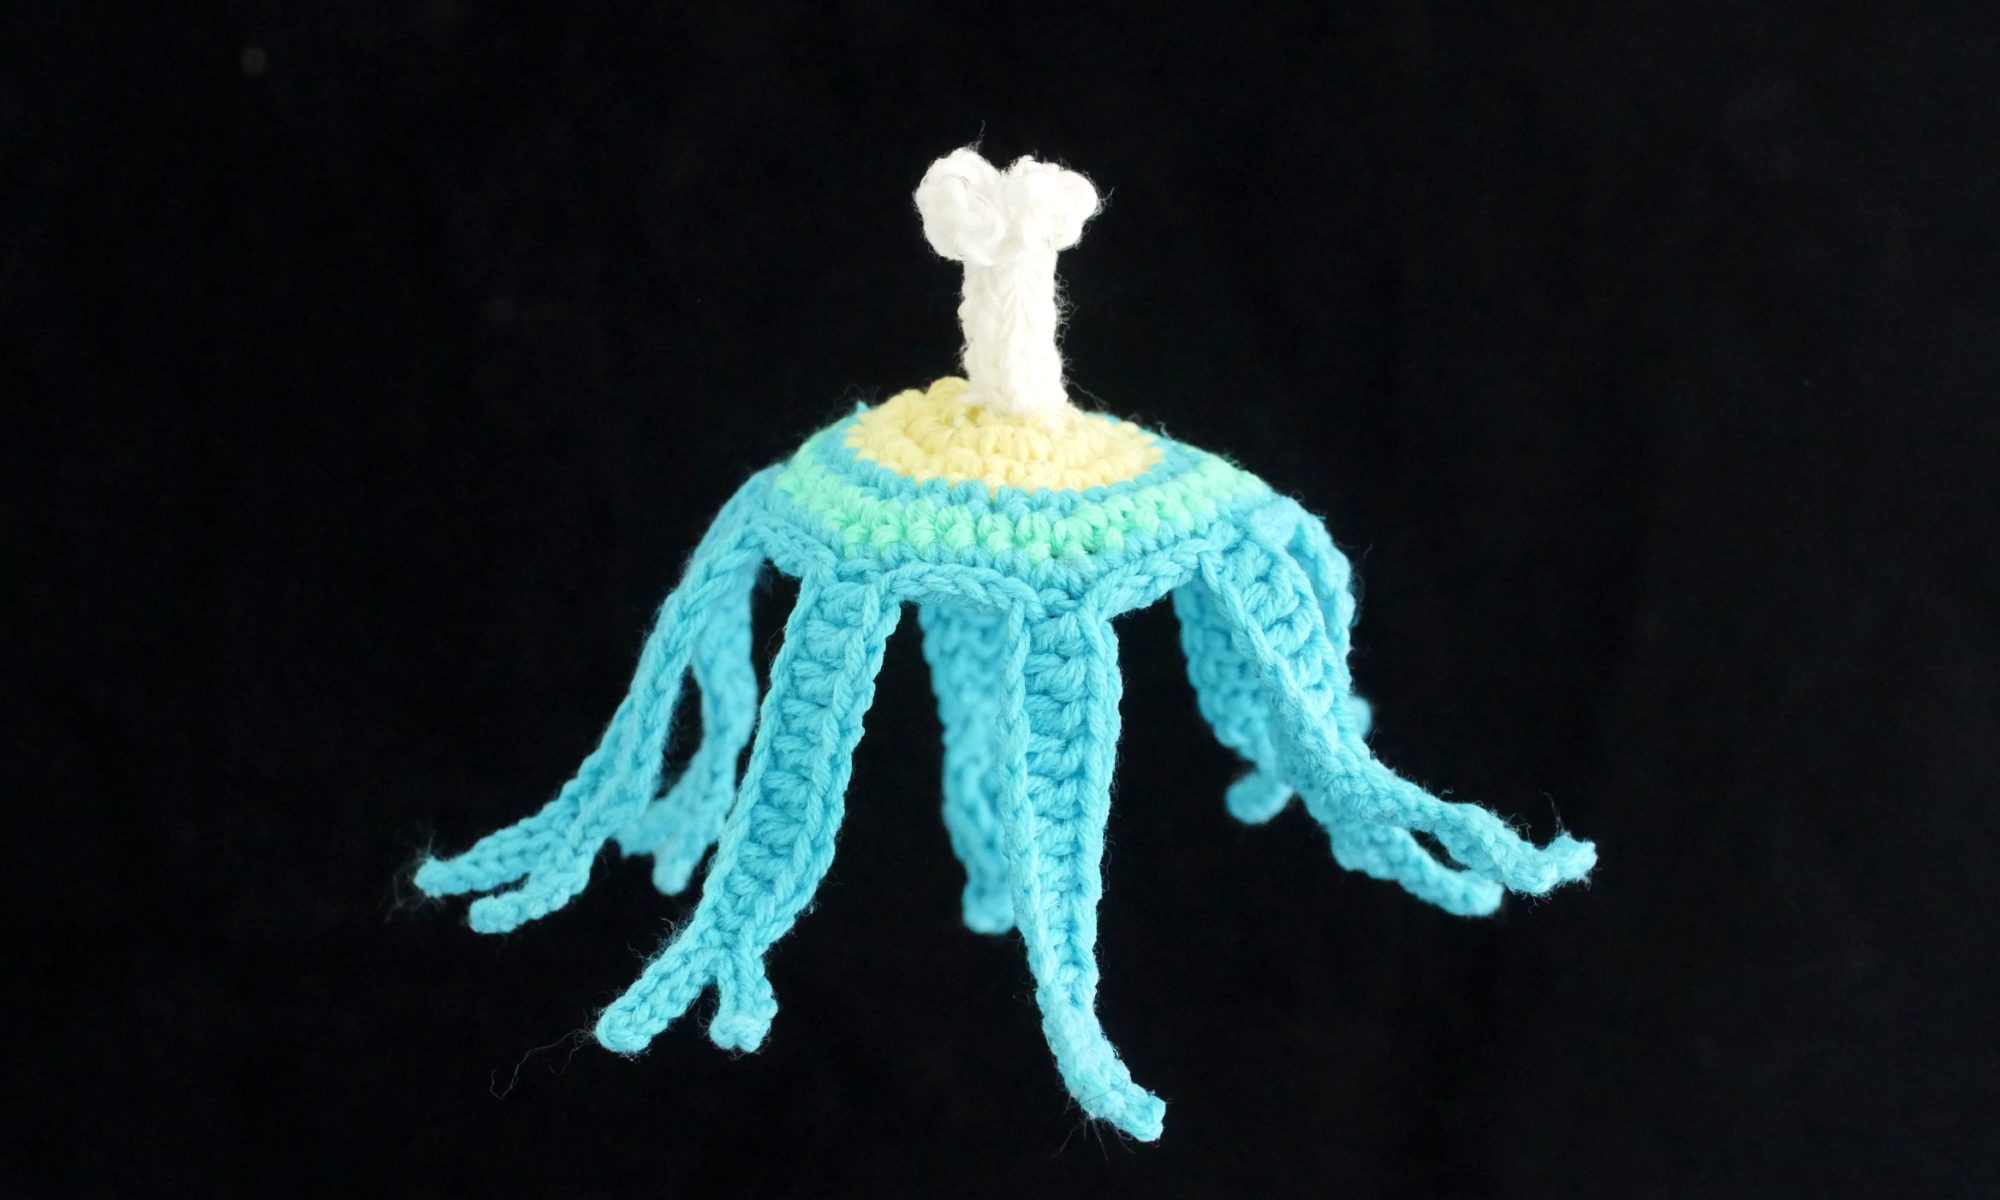
Have you ever been on the shore and seen the water start to glow, seemingly magically? This effect is often caused by dinoflagellates, tiny protists that sometimes glow blue-green when agitated by the tide, an oar, or a human body. Learn how to make your own with simple crochet and some electronics! This tutorial will show you how to make a dinoflagellate that glows and fades when shaken, but you can always leave out the electronics if you’d just like to make the shape of a dinoflagellate.

 (Image from Wonderchews.com)

Skill level: Intermediate, requiring some simple electronics

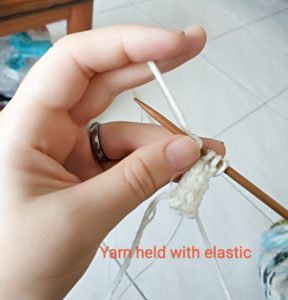
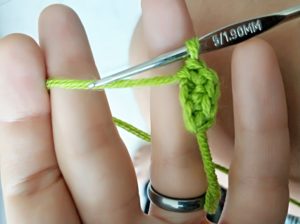
Materials needed: You can use any kind of blue or blue-green yarn for this – I’m using a fine mohair-nylon blend, held triple. Any worsted weight or chunky weight yarn should work. We’re not going to make this too tight to contribute to the translucent effect, so I’m using a G 4.00 mm crochet hook.

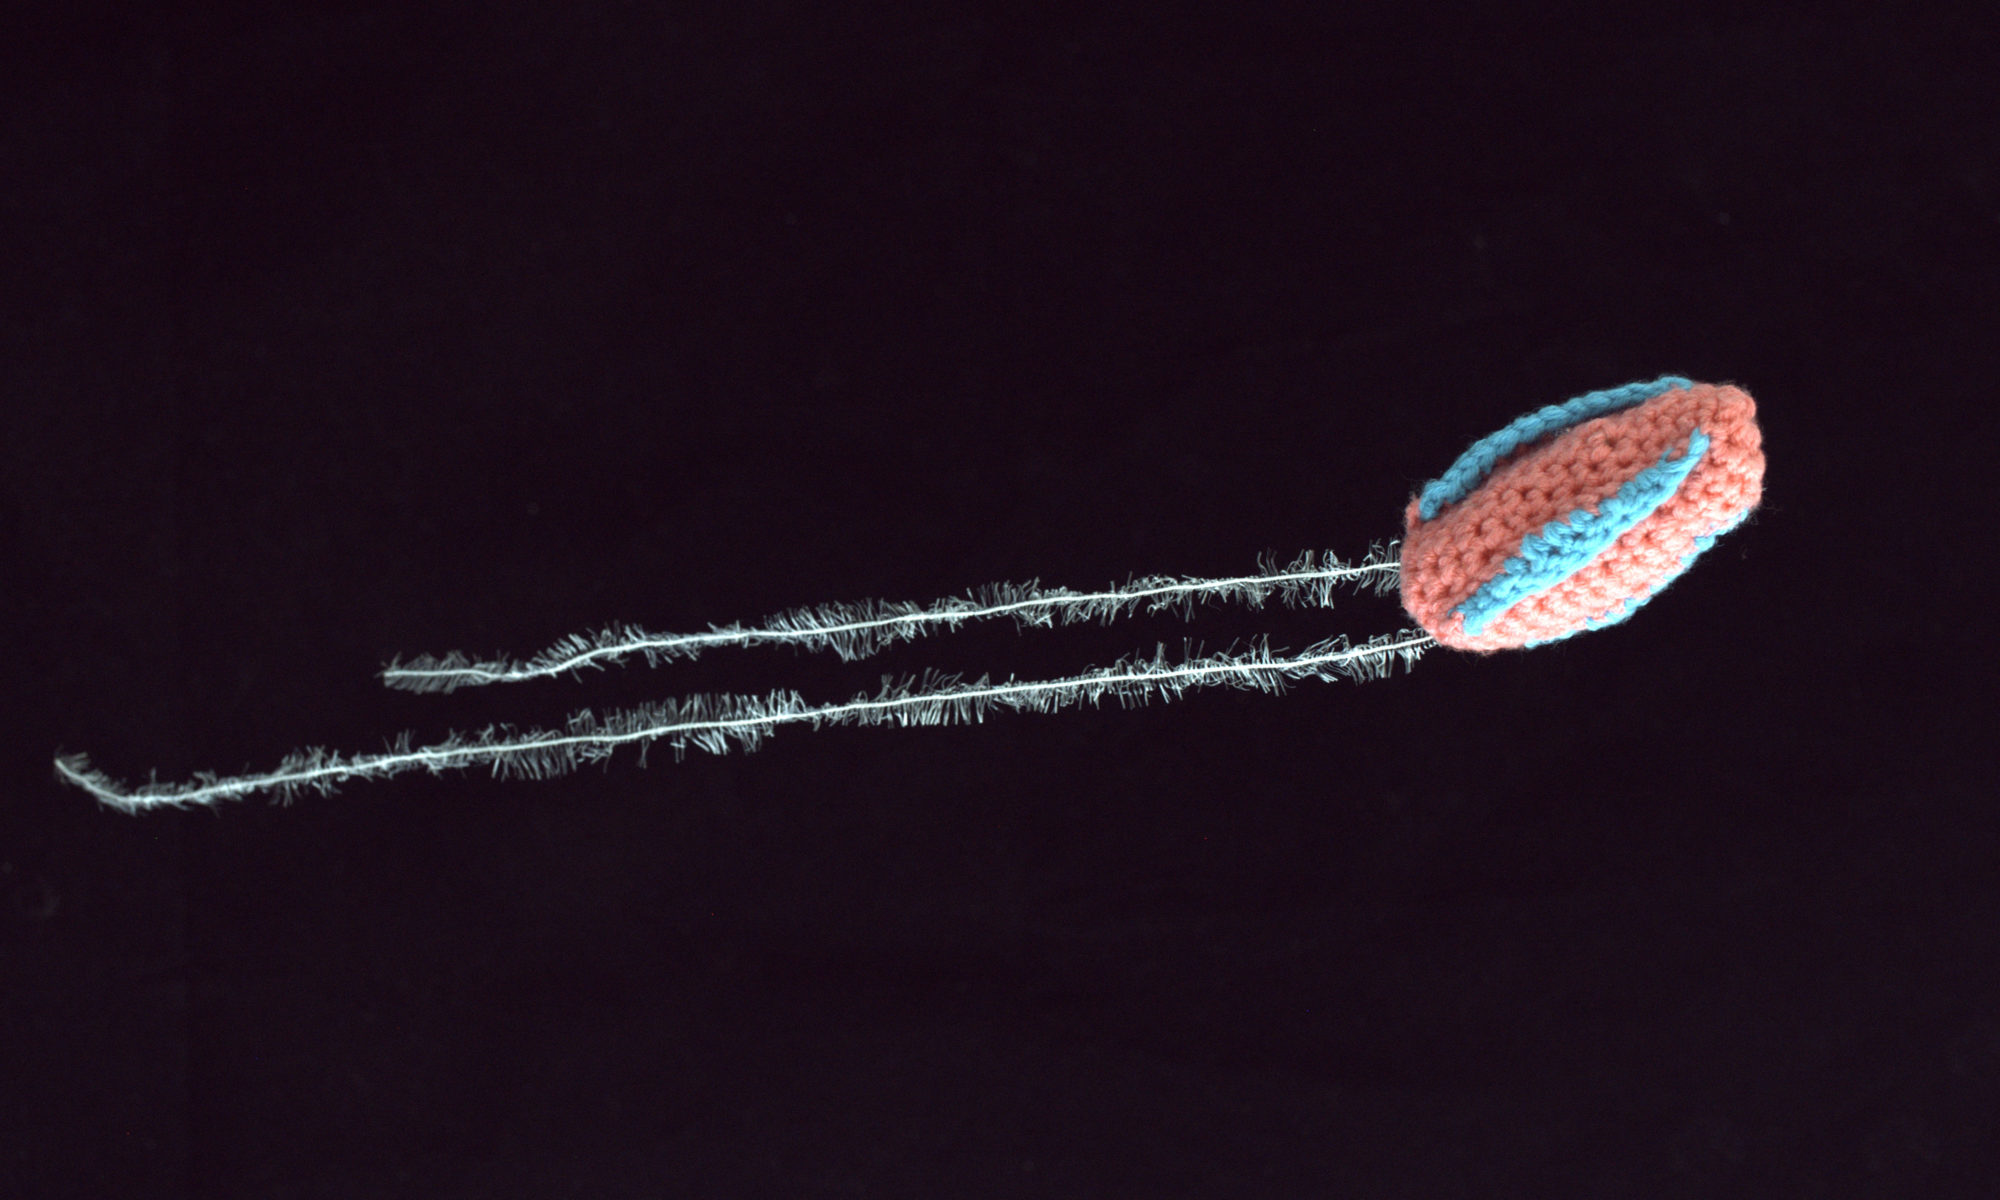
Crochet rows 1-10 twice to make two sides of the dinoflagellate.

P1 – Craft the Creature

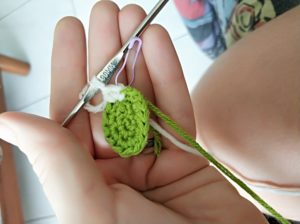
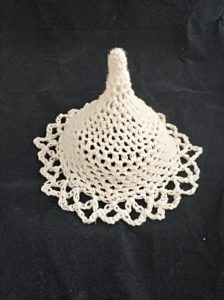
Making the two hemispheres
  1. Crochet six sc in a magic circle. Join last st to first with a sl st. (6)
  2. Inc around. (12)
  3. (Inc, sc) * 6. (18).
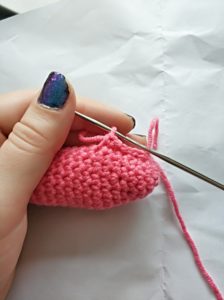
  4. Sc around. (18)
  5. (Inc, 2sc) * 6 around. (24)
  6. (Inc, 3sc) * 6 (30)
  7. Sc around.  (30)
  8. (Inc, 4sc) * 6 (36)
  1. Sc around. (36)
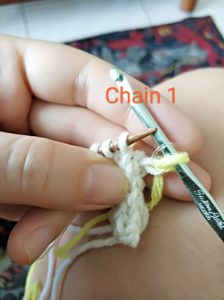
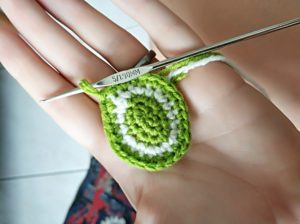
  2. Sl st into first st and ch 1. We will work into the front loop only for this round.(Inc, 5sc) * 6.  Sl st to first st, skipping chain st. Cut yarn and fasten off. (42)
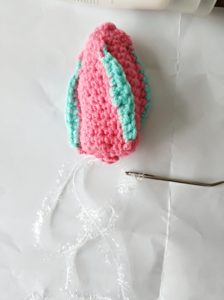
Making the veins and ridges

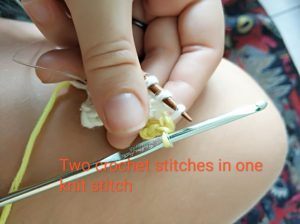
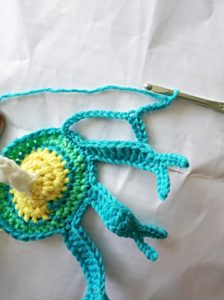
Do some surface crochet to mimic the veins on the dinoflagellate. Simply join yarn anywhere on the outside of a hemisphere near a front-loop seam and vary single crochet and half-double crochet in wanderling lines around each hemisphere. Continue making these veins until you’re satisfied with the surface.

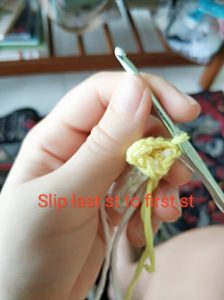
Try chaining at the end of some of the veins to create a dangling thread separating from the body. I made a corkscrew effect by chaining, doing slip stitches back along the first couple stitches of the chain, and then working three scs into each of the remaining stitches of the chain. When I finished the chain, I slip stitched back into the body, finished off, and weaved in the ends.

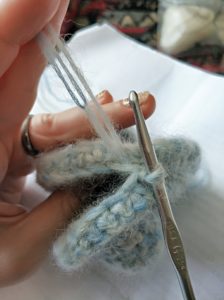
Connecting the two sides

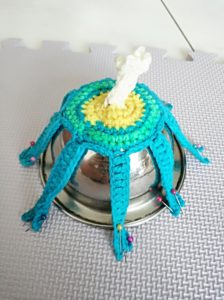
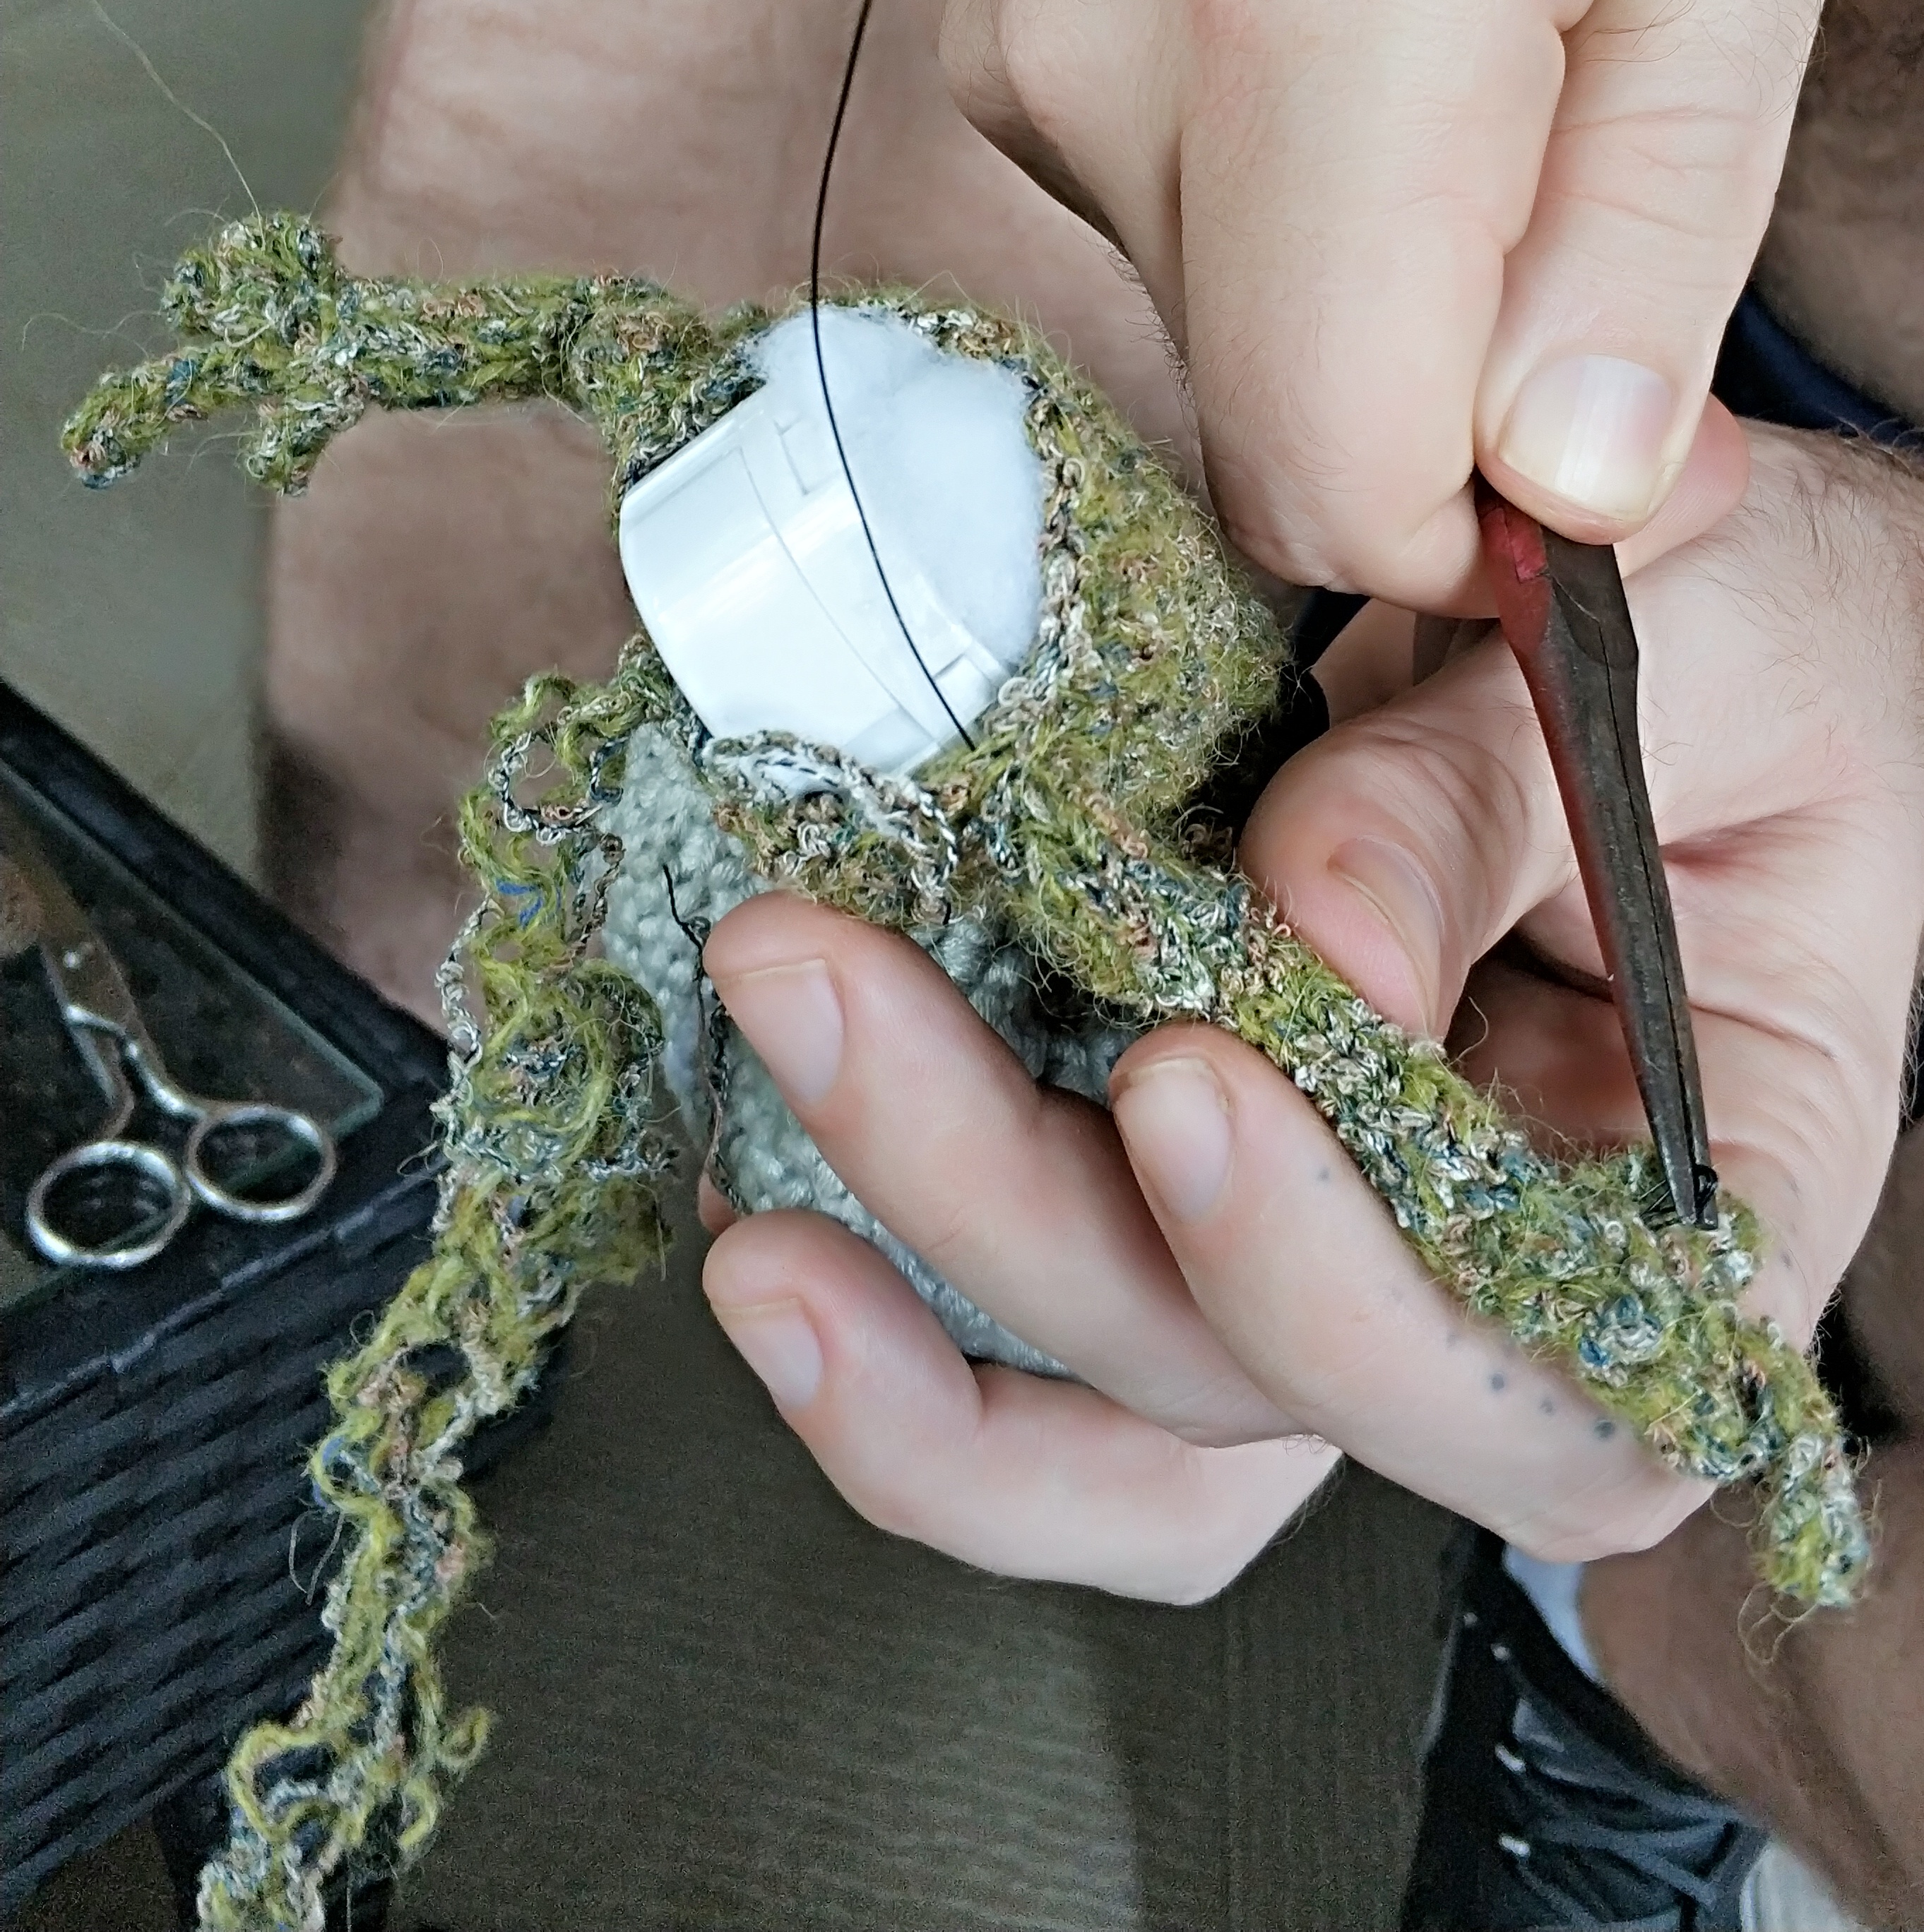
Now we will connect the two halves together. Join yarn to the circle of front loops on one side. Then slip stitch the front loops from each side together. You can do this about halfway around, leaving a gap that is big enough to insert the LED mechanism. 


If you don’t think you’ll need to open the dinoflagellate again to change out the battery, insert the LED mechanism now. You can use a little polyfill to fill it out if you want, but make sure not to obscure the light too much. Then you can slip stitch the rest of the dinoflagellate together, finish off, and weave the end in.


If you’re using the Arduino for your LED, you’ll want to be able to reopen the dinoflagellate to change the battery out. We’ll make some button holes on one side and sew buttons on the other side. After leaving a gap big enough to take out the mechanism, slip stitch in the front loop of one side only about a third of the way across the gap. Then chain two or three, depending on the size of your button.

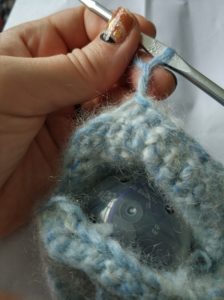
Slip stitch into the next stitch to close the first buttonhole.

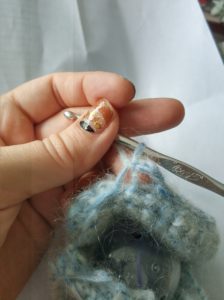
Slip stitch another third of the way, and then chain two or three again. Slip stitch into the next stitch, and then slip st the rest of the way across the gap. Finish off and weave ends in securely.

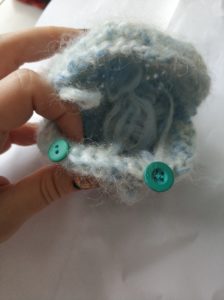
Sew buttons on the front loop circle on the opposite side of the dinoflagellate, making sure to line them up with the button holes.

P2- Making it Light Up!
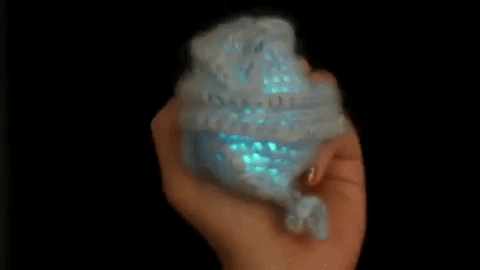
via GIPHY

Real bioluminescent dinoflagellates light up when perturbed. That gives the glowing effect when thousands are in the water and you splash into the ocean during a bioluminescent bloom. We can make a similar system using just some inexpensive open-source electronics!
The electronics are pretty simple. The mechanism we are going to use is just having a switch that changes between open or closed when the dinoflagellate is shaken.
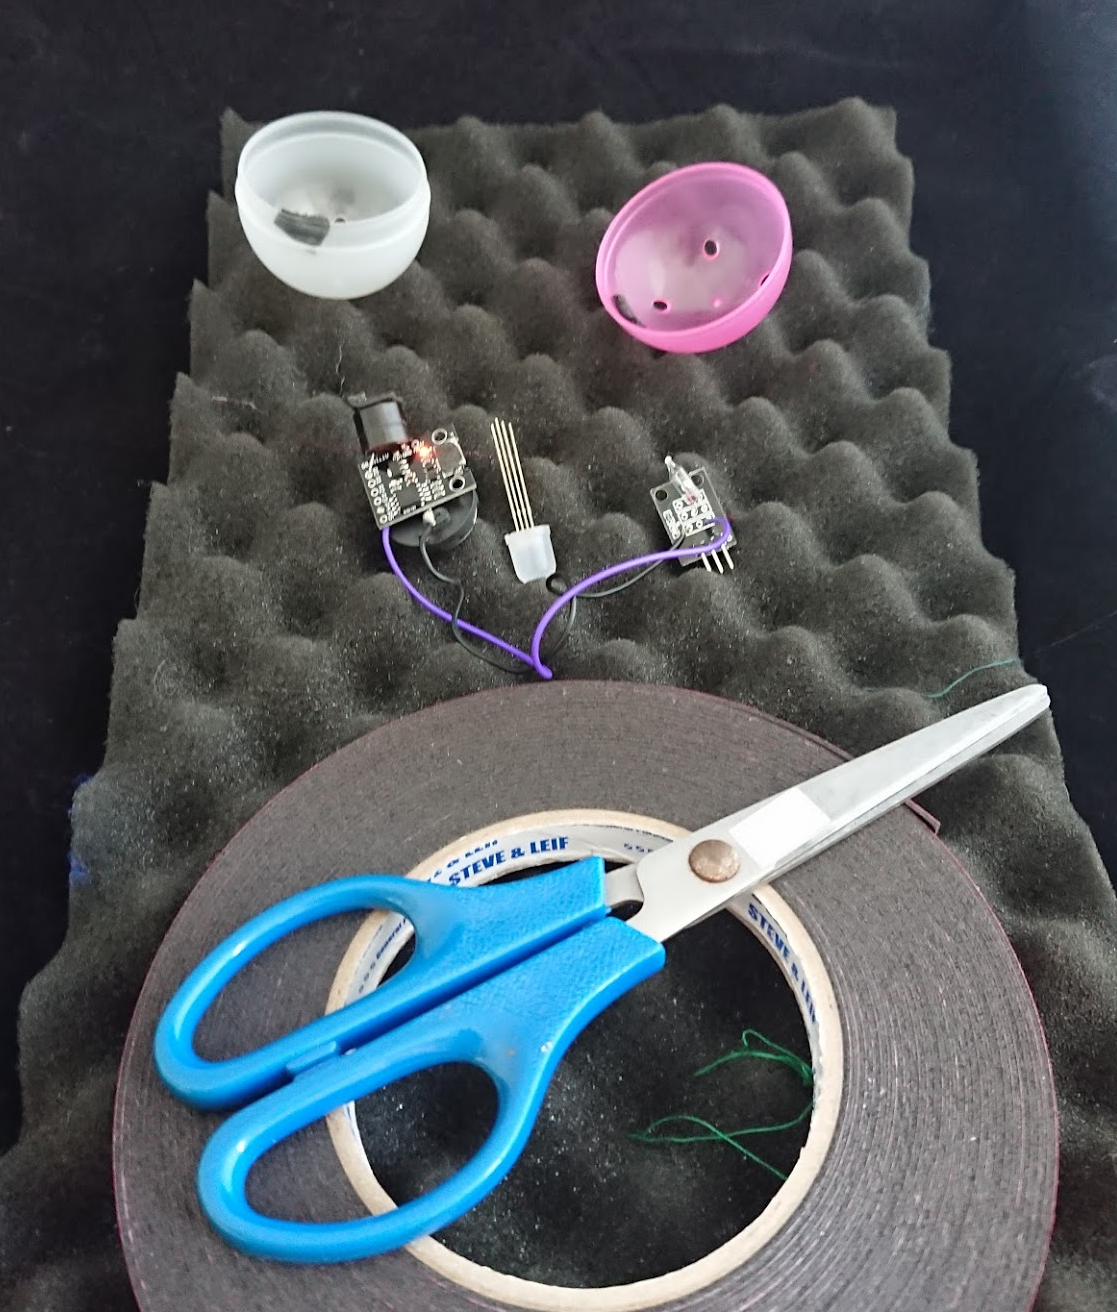
Materials Needed
  • An arduino (We used a digispark ~1$ usd! You can find on aliexpress or ebay)
  • a 10mm RGB LED (this is an led with 4 legs sticking out)
  • 2 coin cell batteries
  • Coin cell battery holder
  • tilt sensor
  • wires
  • wire stripper
  • Double Sided thick sticky tape (the spongy kind)
  • Scissors
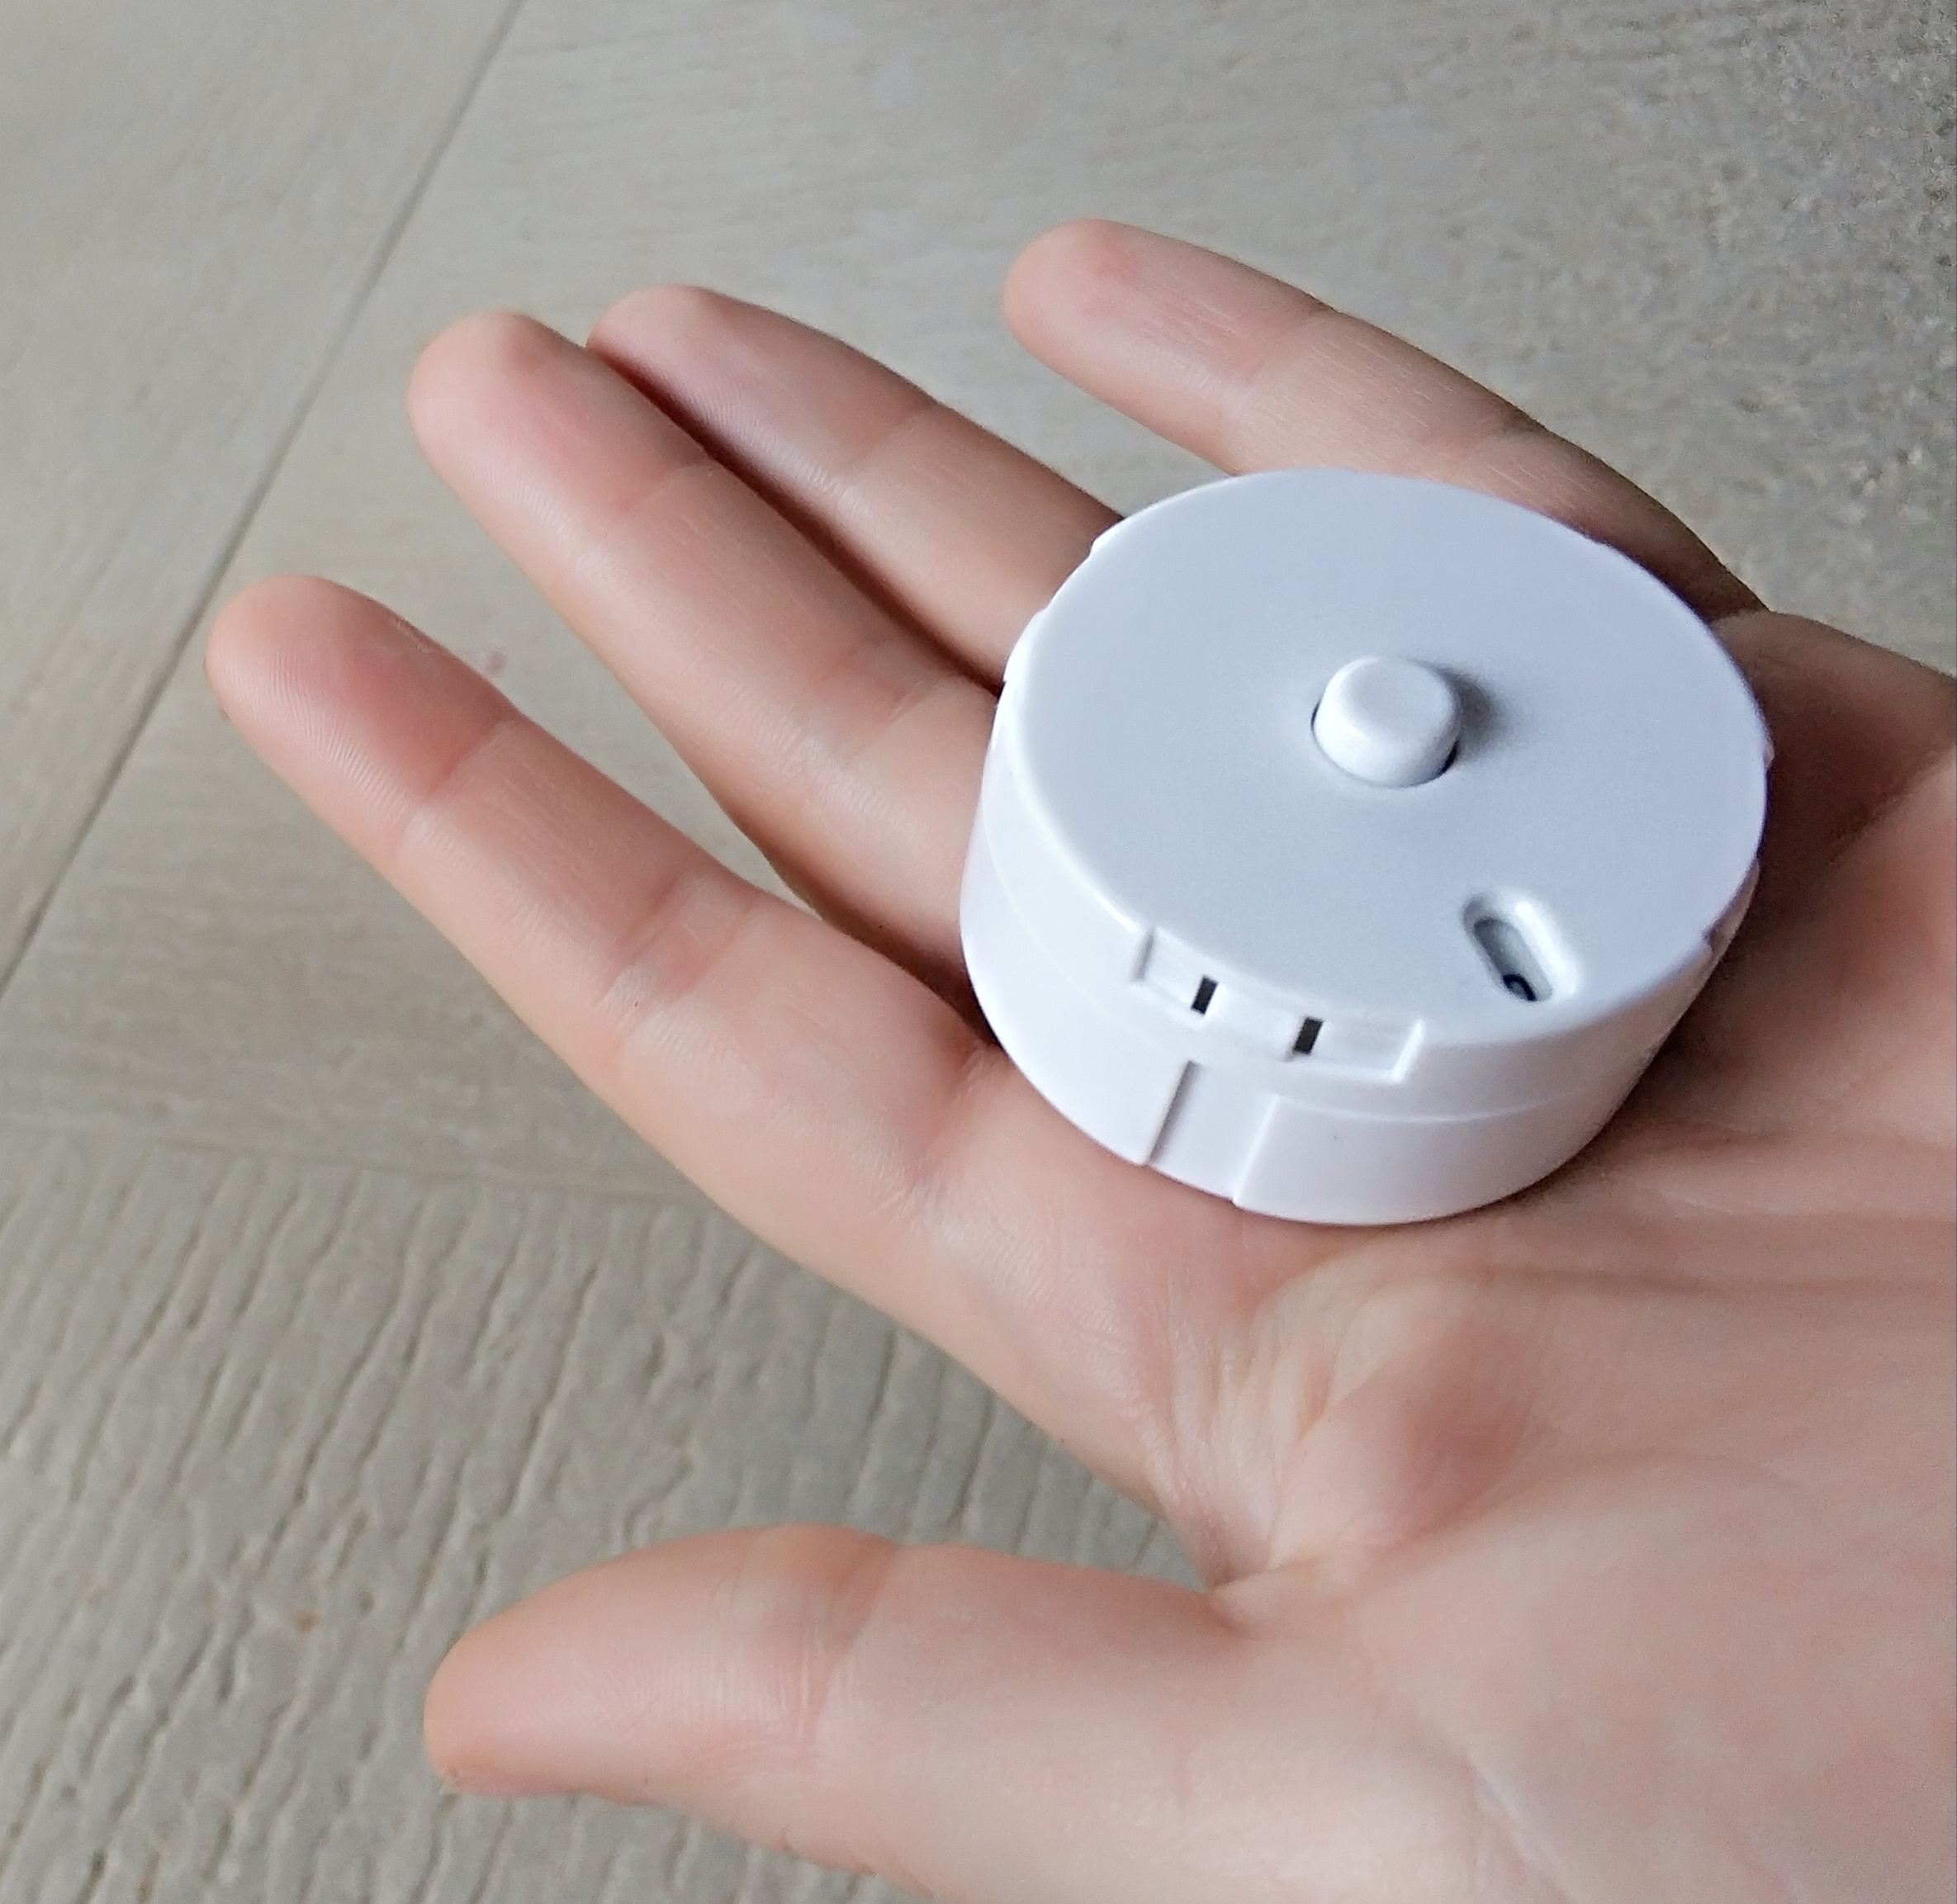
  • Capsule  from a vending machine (like the Gotcha-Gotcha balls in Japan)

Assemble the Electronics

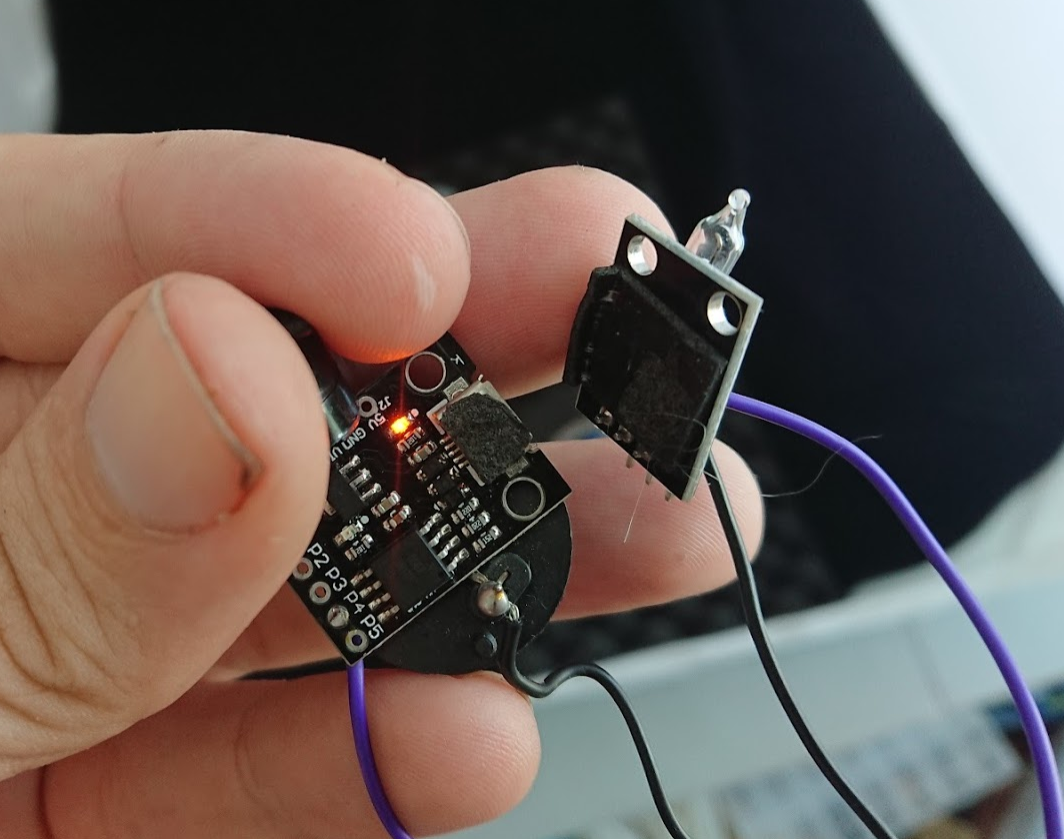
First you can connect the tilt sensor. The tilt sensor is basically just a switch that when it is turned one way it will close the circuit and make a connection between  the two wires inside it. Connect the end of 1 wire to one side of this sensor/switch, and connect the other side to pin 4 of your arduino. (purple wire in the pic below). Then connect the second side of the sensor to the GND side of the arduino (or just the negative side of the battery).

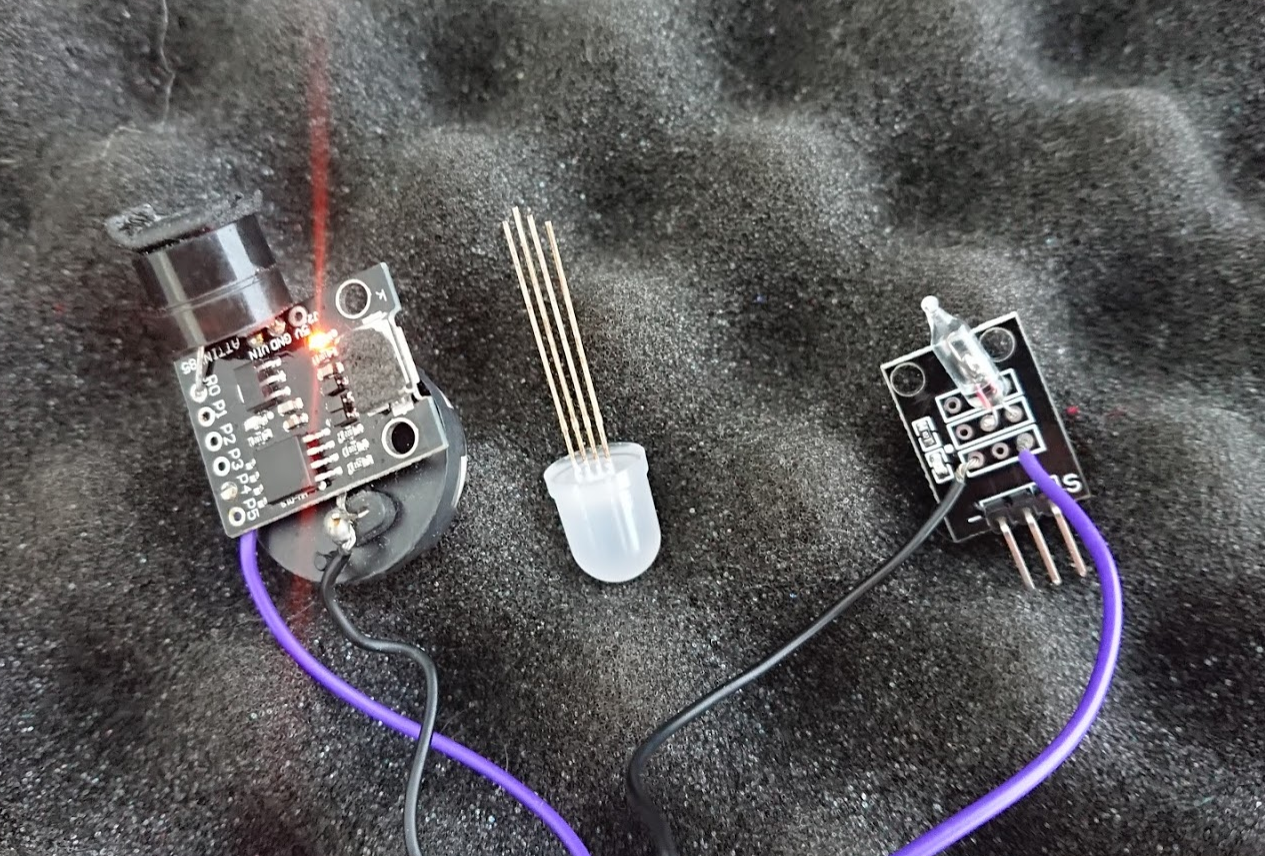
Now use some of your double sided tape to stick the tilt sensor securly onto the arduino.

On your LED, there is 1 really long leg which is the common ground (or common + if you get a different type of LED). The other 3 are the Red Green and Blue led legs.  Take the RGB LED and part its 4 sets of legs in the middle into 2. Put a coin cell battery in between these two sets of legs, and try to make it light up. It if doesn’t light, flip the battery over and try it again. With this orientation, you should get a nice bluish light that shines from your LED.

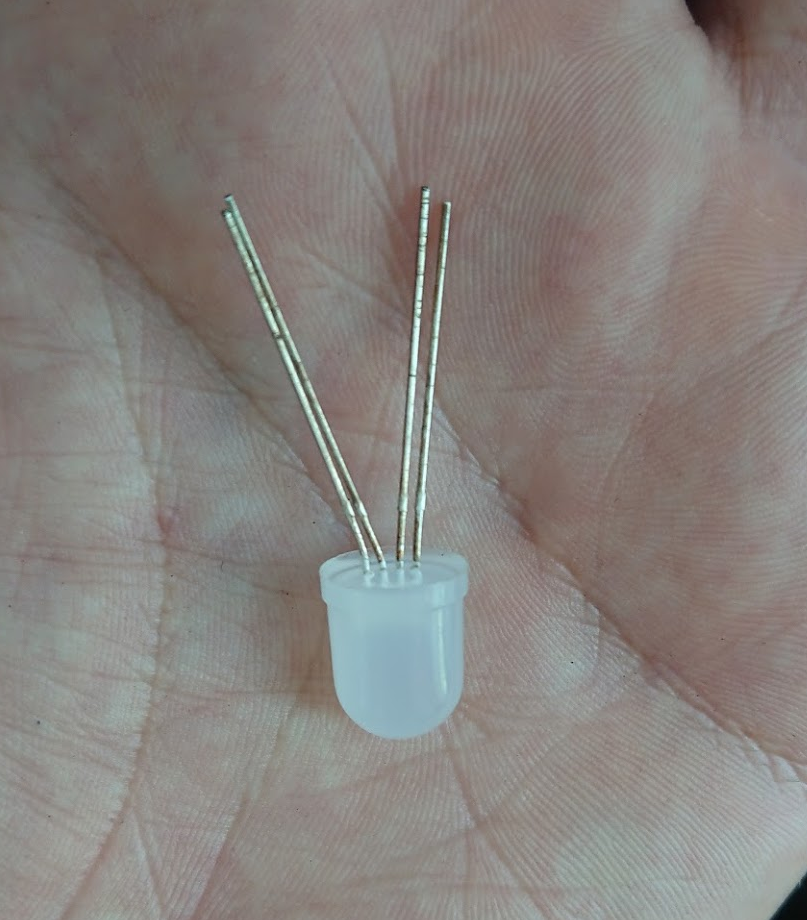
Plug the two legs that touch the + side of your battery into Pin 1 of your arduino. Plug the other two legs into either the GND pin or to Pin2 (which we turn into a GND pin with code later).

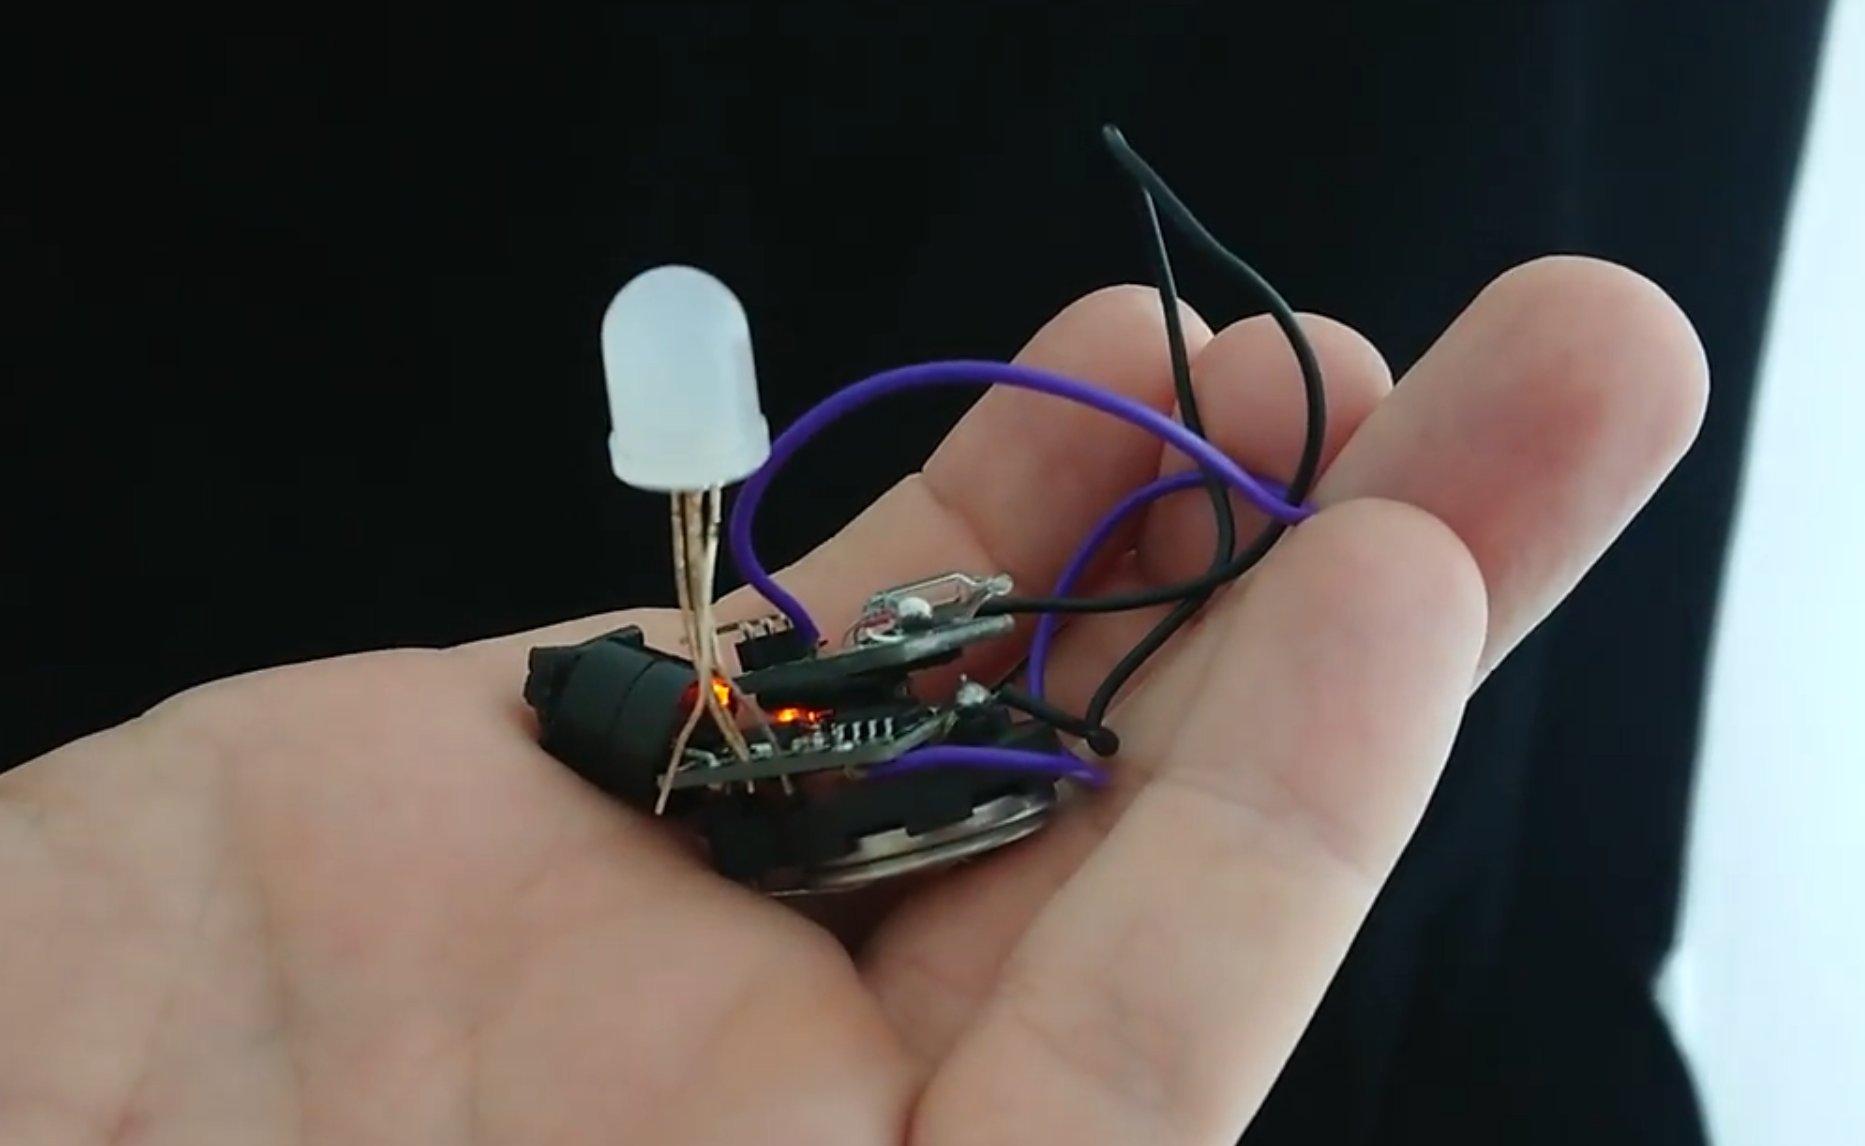
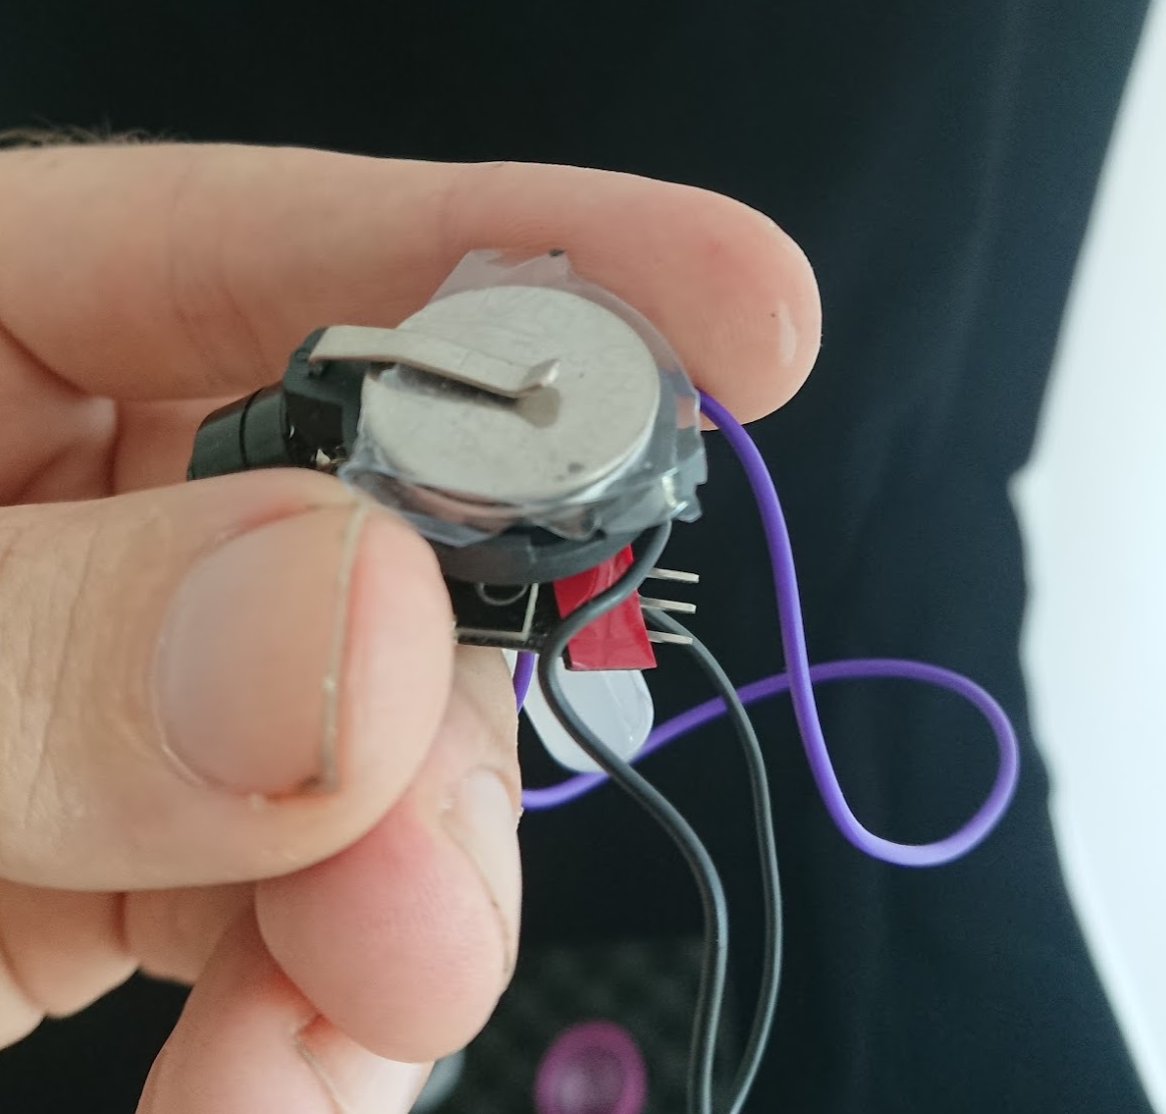
Finally, lets add some power to our arduino. We need some batteries for it to run. Load in two 3 Volt, coin cell batteries (the digispark arduino we are using needs at least 5 Volts to turn on, so that’s why we stack them).

When we want to turn it off, we can just slide a thin peice of plastic between the batteries and the holder.

Program the Arduino

The final steps can be pretty quick!

Download the Arduino program from Arduino.org

copy and paste this code into your editor.

connect your arduino to the computer and upload it!

/*
Dinaflagellate Shake and Glow Code
Attach a simple tilt sensor (or two wires that bump into each other)

from andy Q and kitty Q
Public domain
*/

// You will need to change this for other arduino versions - the PWM pin the LED is attached to
int led = 1; // On the Digispark, we set the LED to be Pin 1

int brightness = 255; // how bright the LED is. We start at max 255
int fadeAmount = 20; // how fast to fade our LED fade the LED by
int extragnd = 2; //We are setting pin 2 to basically function as a ground pin to make it easy to plug in our LED

//We connect one wire of our sensor switch here
//The other side of the tilt switch sensor will be connected to GND, so when the switch toggles on, it will read as 0, and when the switch is open it will read as 1.
const int sensorPin = 4;


int sensorval = 0; // Our sensor will either be 0 (Ground - low voltage) or 1 (High voltage (~5V))

int prevstate = 0; // we don't really care about if our sensor reads as a 0 or a 1,

int buttonState = 0; // current state of the button

// the setup routine runs once when you press reset:
void setup() {
// declare pin 9 to be an output:
pinMode(led, OUTPUT);
pinMode(sensorPin, INPUT_PULLUP);
digitalWrite(sensorPin, HIGH); //we start our sensor as normally HIGH or 1 when it is not touching ground
pinMode(extragnd, OUTPUT);
digitalWrite(extragnd, 0);
}

// the loop routine runs over and over again forever:
void loop() {

// read the state of the pushbutton value:
//If the switch is tilted one way buttonstate will be 0, and the other way it will be 1
buttonState = digitalRead(sensorPin);

//We don't actually care what buttonstate is, as long as it is different from before
if (prevstate != buttonState) {
brightness = 255;
} else {
}

//save the old button state as the previous state
prevstate = buttonState;

// set the brightness of the LED:
analogWrite(led, brightness);
//if no change happens, it keeps going down until 0
brightness = constrain(brightness - fadeAmount, 0, 255);

delay(30);
}

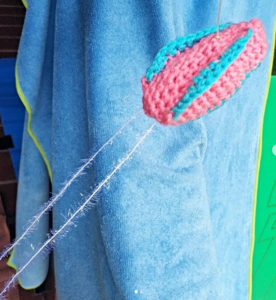
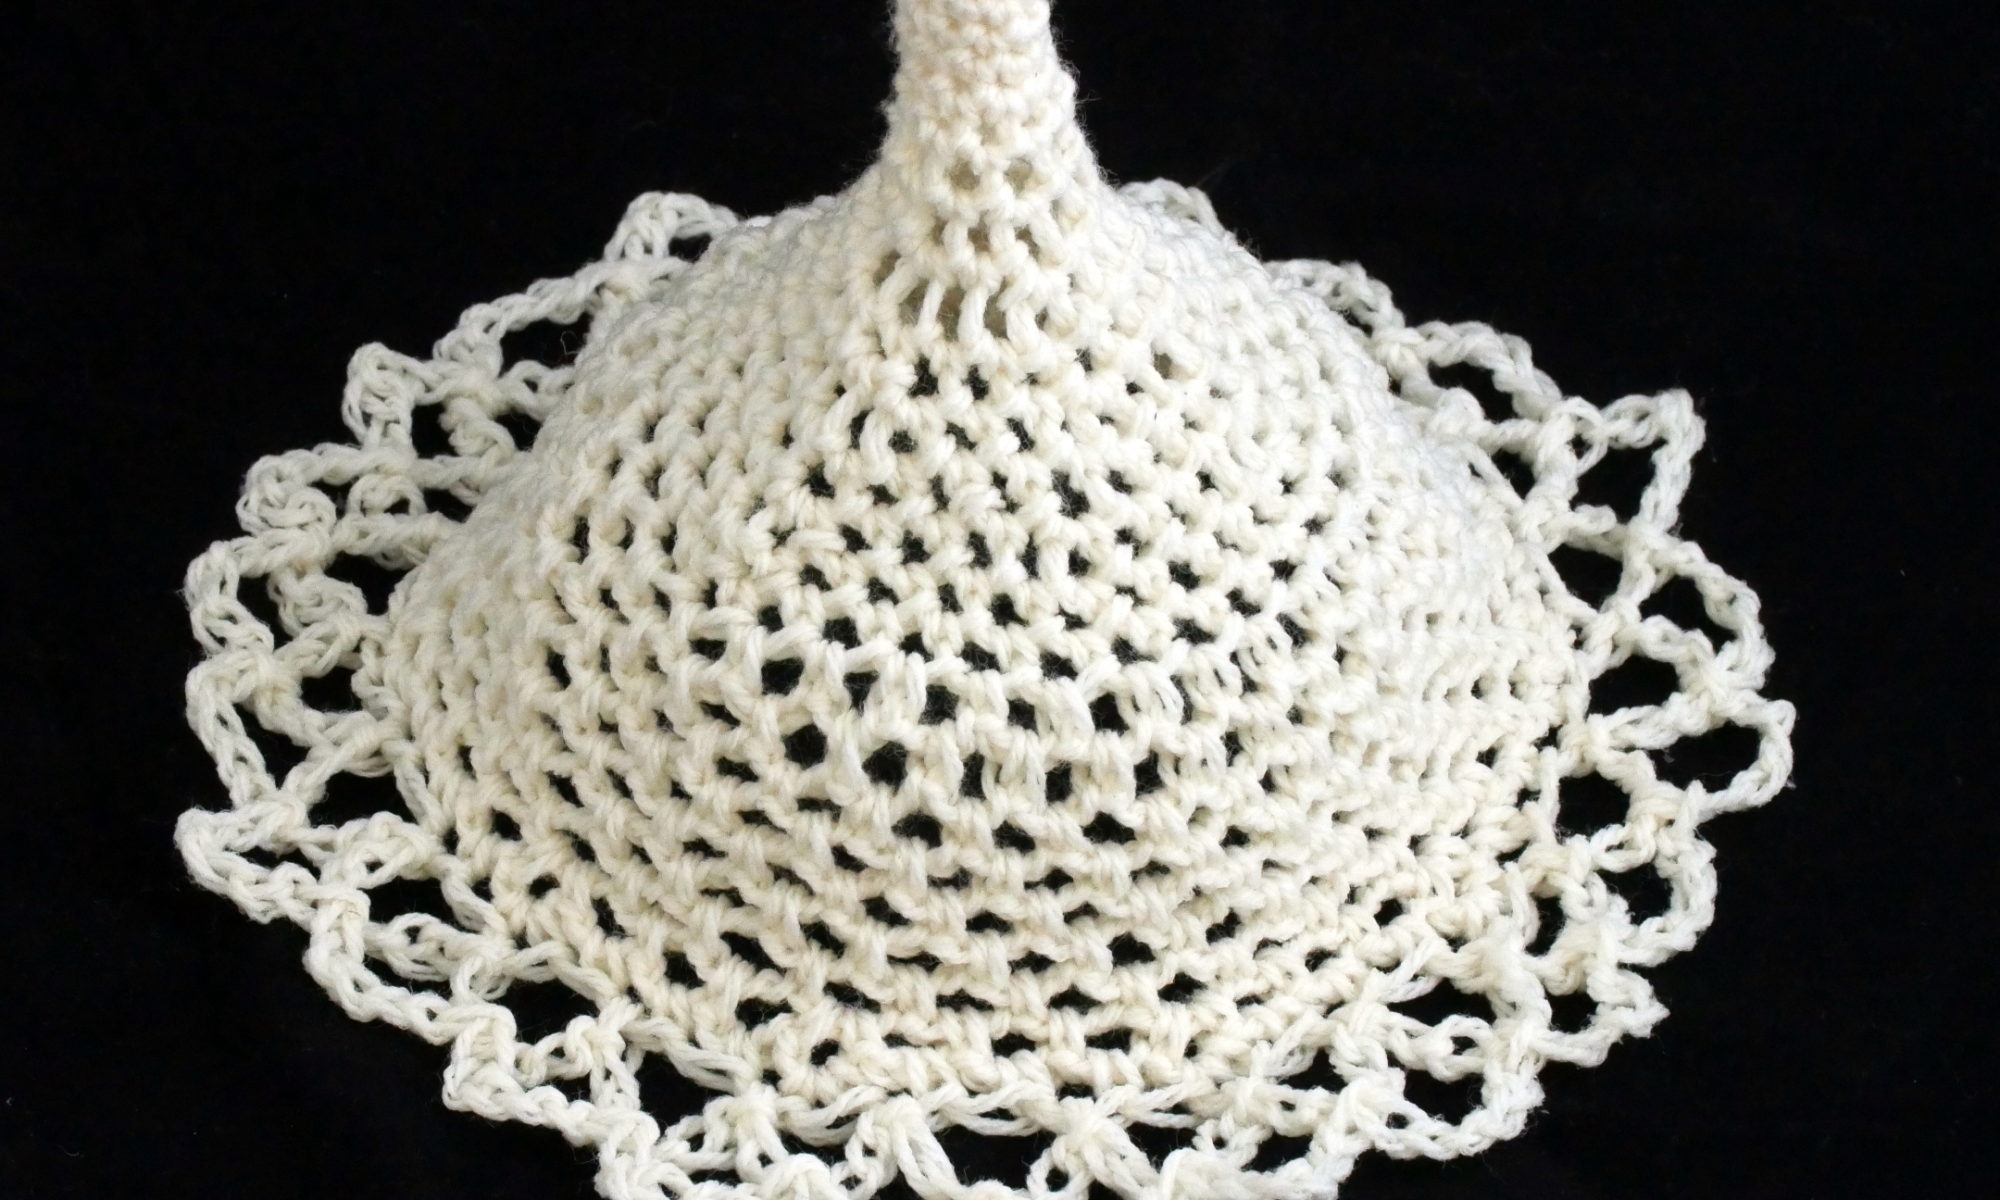
Finally, you can put everything safely inside the plastic ball and button it up inside your little dino! Yay!

Make your own sea gooseberry!

The sea gooseberry is a type of ctenophore, which means “comb jelly.” They’re an ocean invertebrate that typically eat other tiny ocean creatures.

Here’s what we’ll be making, along with the image that inspired it.

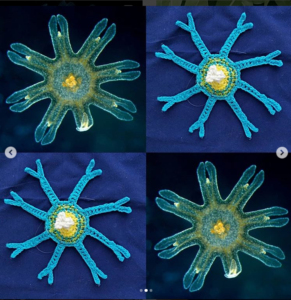
 (original photo from Comb Jellies Wikispaces)

Skill level: Beginner

Materials needed:

  • Blue yarn
  • Pink yarn
  • Novelty white/fluffy yarn
  • Small crochet hook (I used a 2.00 mm hook [US 0, UK 14])
  • Tapestry needle

1.  With pink yarn, make a magic circle with 6 sc. Slip stitch the beginning stitch to the end to join the circle. (6 sts)

2. Inc 6 times (12).

3-5. Sc around (12).

6. (inc, 2sc) * 4 (16).

7-17. Sc around (16).

Stuff form with polyfill.

18. Sc2tog 8 times (8).

19. Sc2tog 4 times (4). Cut yarn, pull taut, and use a tapestry needle to hide tail inside the form.

Making the ridges

Join pink thread toward the beginning (magic circle) side of the form. Work in a line toward the bottom of the form as such:

4 sl st; 6 sc;  5 sl st.

Now join the blue thread on top of the pink line you just created. Work as follows:

2 sl st; 2 sc 2 hdc, 2 dc, 2 hdc; 2 sc; 2 sl st.

Repeat these steps to make as many ridges as you like. I made three.

Adding the tentacles

Using the novelty fluffy white yarn, thread a tapestry needle with a 12″ length of yarn. Simply insert the needle in the “bottom” of the ctenophore, just off the center of the ending four-stitch circle, and push it out a bit on the other side of the center. Pull the yarn out and even out both sides.

You can tie it in place if you want, but as long as no one tugs too much on the tentacles, they should stay in place just fine. Good job!

Make your own cute little ocean bacterium!

Let’s make a prochlorococcus bacterium! I didn’t know anything about this bacterium, but according to Wikipedia, it is a photosynthetic picoplankton (cute!) which is “among the major primary producers in the ocean, responsible for a large percentage of the photosynthetic production of oxygen” (https://en.wikipedia.org/wiki/Prochlorococcus). Without these little buddies, life as we know it would be very different!

Here’s what we’ll be making and a picture of what inspired it. I thought I would add a little extra personality to the bacterium with a face. You can decide whether you want to include that or not.

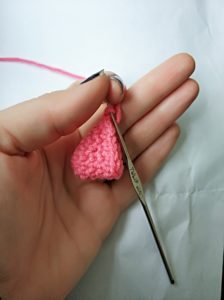
  (image from Wikipedia)

Skill level: easy

Skills needed: basic crochet, basic embroidery

Materials needed:

  • green yarn
  • white yarn
  • black embroidery thread
  • pink embroidery thread
  • 1.9 mm crochet hook (or hook of similar size)

We will make two sides of the bacterium, embroider a cute face on one side, and slip stitch them together. To make the oval shapes, we make a chain, work along both sides, and then increase on each end in each row.

  1. With green, chain 4.
  2. Sc in 2nd ch from hook, and in each of the next 2 chains. Work 2 more sc in the same space as the last sc. 
  3. Turn the piece so you can work on the opposite side of the foundation chain. Sc in the bottom of the second sc you did on the other side. 2 sc in the bottom of your first sc on the other side. You now have 8 scs – 1 on each side and 3 on each end.
  4. Inc in first stitch and place marker in first stitch of new round. Sc, 3 inc, sc, 2 inc. Sl st last st to first st.(14)
  5. Changing to white yarn, chain one. In same st, inc. 2 sc, (inc, sc) * 3. 2sc, (inc, sc) * 2. (20) Skipping chain st, sl st first st to last st.
  6. Changing to green yarn, chain 1 and increase into same st.  3 sc, (inc, 2sc) * 3. 3sc, (inc, 3sc) * 2. Skipping chain st, sl st first st to last st. (26)

After finishing first oval, cut and weave in all ends, but do not cut green yarn after finishing the second oval.

Embroidering face

Embroider cute little face on one side! I used french knots for the black eyes and pink cheeks and backstitch for the black smile. Check the image at the top if you need more guidance, or google around for other ways to embroider faces if you prefer a different style. 

Finishing

Once you’re done with the face, start to slip stitch the two sides together. When you have just a few stitches left, stuff the form with polyfill or yarn snippings. Once filled, slip st the rest of the ovals together. Cut yarn and pull the end into the form with your hook. Done!

Make your own radiolarian!

Radiolaria are beautiful little protozoa. I learned about them when reading about the biological artist Ernst Haeckel, who portrayed them beautifully. 

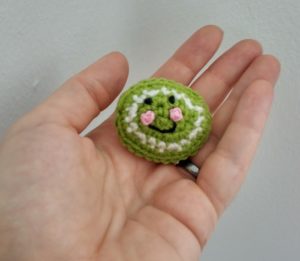
 (image from The Scientist Magazine)

Here’s what we’ll be making, along with the image that inspired my design.

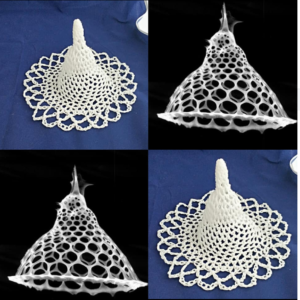
 (image from dorabella-ommo.blogspot.com)

Skill level: easy- intermediate

Skills needed: basic crochet

Materials needed:

  • white or off-white yarn
  • three sizes of crochet hook (sizes aren’t too important, but the biggest one should be a lot bigger than the smallest one. I used 3.25 [US D, UK 10], 5.5 [US I, UK 5], and 10 mm [US N, UK 000] hooks.)
  • white glue or starch
  • blocking board for knitting, or a clean sheet
  • rust-proof straight pins
  • a few bowls and bottles of varying sizes for shaping the radiolarian

Let’s get started! 

1.  With smallest hook, crochet six single stitches in a magic circle. Sl st last st to first st.  Cinch tight (6 stitches)

2. (Inc, sc) * 3. (9)

3-5. Sc around. (9)

6. Switch to the next size of hook – I used a 5.5 mm. Sc around (9).

7. Sc around. (9)

8. Switch to largest hook – I used 10 mm. (Inc, sc, sc) * 3. (12)

9. (Inc, sc) * 6. (18)

10, (inc, 2sc) * 6. (24)

11. Sc around. (24) Here’s what our radiolarian looks like at this point. 

12. (Inc, 3sc) * 6. (30)

13-14. Sc around. (30)

Beginning of chain section. Switch back to small size size hook.

15. Sl st into first st of round. (Chain 3; sc into following st) around. (30 sections of chain 3 segments)

16-23. (Chain 3, sc into next chain section) around.

24. (Chain 3, sc into SAME chain section for an increase, [chain 3, sc into next chain section] * 2) * 10.

25. Switch to largest size hook (10 mm). One row break from chain section. (Inc * 2 into one chain section,  [sc into next chain section] * 3) * 10.

26. Final chain section. (Sl into first stitch, chain 5, skip next stitch, sl st into following) around.

27. (chain 5, skip next stitch, sl st into following) around. Finish off and weave in end.

If you want to make the radiolarian stand up and hold shape, you’ll need to use a stiffening solution. There are several ways to do this, such as by diluting white glue with water or by cooking a starch solution. You can find instructions for making a stiffening solution here: https://craftingagreenworld.com/articles/diy-natural-fabric-stiffeners/

Once you’ve made the solution and let it cool enough so you can touch it, immerse the radiolarian form fully in the solution. Let it sit and soak for about a minute. In the meantime, prepare a clean area where you can stretch it over a mold and pin it down. I like to use a blocking mat for knitting. Assemble a few different shapes that will fill out your radiolarian. I used a bowl with a little bottle on top of it to fill the tip of the radiolarian.

Stretch the radiolarian over the shapes, fan out the lacy edges, and pin the edges down with rust-proof straight pins.

Let the form dry, under a fan if necessary, unpin, and detach the radiolarian carefully from the shapes and blocking board. Good job!!

Make your own ephyra!

The ephyra is a stage in the life cycle of a jellyfish. Check out these instructions for how to make your own! The following images are my crafted ephyra interspersed with the images that inspired it.

.

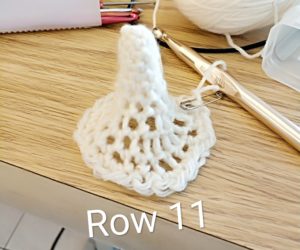
 (image source: Ingo Arndt)


Skill level: Intermediate

Skills needed: basic crochet, I-cord knitting

Materials needed:

  • white, yellow, blue, and green yarns

  • stretch jelly elastic

  • two 3.75 mm double

  • -pointed knitted needles (US 5, UK 9)

  • 3.75 mm crochet hook (US F; Canada/UK 9) 

I used yarn held with stretch jelly elastic (like the kind used to make stretchy beaded bracelets) in order to mimic the translucent quality of the ephyra.

Let’s begin!


With white yarn and elastic, cast on 4 knit stitches, leaving a long tail, about 16 inches.

Rows 1-7: Knit 4 stitches in I-cord. (4 stitches)

8. switch to crochet and yellow yarn with elastic.

With stitches on knitting needle, insert crochet hook into first stitch. Chain one with yellow yarn and elastic.

Increase by doing two yellow single stitches in the one knit stitch. Remove stitch from knitting needle once you’ve increased the knit stitch.

Repeat crochet increase in the next three knit stitches and put knitting needles away. Slip stitch into first crochet stitch, joining the round. (8).

9: increase in each stitch (16).

10: (inc, sc)*8. (24)

11: One round in blue and elastic. Sl st with blue yarn into first stitch of round. Chain 1. In same st, increase. 3 sc in next 3 sts. (Inc, 3 sc) * 5. (30)

12. One round in green and elastic. Skipping chain st, sl st with green yarn into first stitch of round. Chain 1. In same st, increase. 4 sc in next 4 sts. (Inc, 4 sc) * 5. (36)

Work in blue and elastic for remainder.

13. Skipping chain st, sl st with blue yarn and elastic into first stitch of round. Chain 1. In same st, increase. 8 sc in next 8 sts. (Inc, 8 sc) * 3. (40)

Working the arms.

Sk ch st, sl into first st. Chain 16.

Working back along chain, 5 sl sts. Before working the rest of the chain, chain 6. (In the image, I ran out of elastic and am using only blue yarn, but please do work with elastic and yarn throughout the pattern!)

Working back along secondary chain, 5 sl sts.

Now returning to the main chain, 1 sc, 1 hdc, 8 dc. At end of chain, sl st into the next st of the circle. Sl 4 more, then repeat from “chain 16” to make 7 more arms.

When you’ve slipped into the st just before the first arm, fasten off.

Petals on I-Cord

Go back to the tail of white yarn and elastic that you left at the beginning of the I-cord.

(Sl into the next st, ch 3 and sl back into the same st) * 4. When you’ve finished 4 petals, finish off and weave in all ends.

Stiffening the ephyra

If you want to make the ephyra stand up and hold shape, you’ll need to use a stiffening solution. There are several ways to do this, such as by diluting white glue with water or by cooking a starch solution. You can find instructions for making a stiffening solution here: https://craftingagreenworld.com/articles/diy-natural-fabric-stiffeners/

Once you’ve made the solution and let it cool enough so you can touch it, immerse the ephyra form fully in the solution. Let it sit and soak for about a minute. In the meantime, prepare a clean area where you can stretch it over a mold and pin it down. I like to use a blocking mat for knitting.

Assemble a few different shapes that will fill out your radiolarian. I just used a bowl that fit ok. Stretch the ephyra over the bowl/mold, fan out the arms, and pin the edges down with rust-proof straight pins. I recommend that you try to pin the two sections of the arms close to each other so they form less of a v-shape and look more like the picture we’ve based the ephyra off of.

Let the form dry, under a fan if necessary, unpin, and detach the ephyra carefully from the mold and blocking board. Good job!!

Plarn turtles

I’ve been playing around with plarn, which is “yarn” made by slicing up used plastic bags. I really like the color of the green bags I get from the grocery delivery service RedMart here in Singapore.

So far, I’m mostly knitting little turtles with them. The turtles in these pictures are made with a combination of traditional yarn and plarn – I’m typically knitting the shells entirely out of yarn and the appendages and heads with yarn and plarn. The tiniest turtle in the picture with the jellyfish is made entirely of traditional yarn.

There are lots of ways to make plarn, but I like to cut off the handles and the bottom, slice the bag in half so it lies flat, and then cut zigzags with a rotary cutter to make one long continuous piece of plarn. Make sure to use a cutting board behind the rotary cutter! Or try out different methods to see what works for you.
And here is the pattern for these adorable turtles: https://www.ravelry.com/patterns/library/sea-turtle-stack

Porgs

I found this pattern for amigurumi porgs from @geekyhooker, and I just couldn’t resist making them. Here’s a link to her pattern if you want to try it for yourself! https://www.ravelry.com/patterns/library/porg-4

Giant mandala project

I crocheted this enormous mandala from the wonderful pattern, Mandala Madness. People from all over the world have done it in all kinds of color schemes! This color scheme is loosely based on the Tibetan sand mandalas that I used to watch monks painstakingly create over the course of Tibet week at Emory University.  It did end up pretty huge, but this is actually only about 2/3rds of the total pattern. Maybe I’ll add more rows someday.

I was a little afraid to do this at first, because I wasn’t sure what I would do with the completed mandala, but I decided just to make it because I knew I wanted to.  I’m glad I eventually found a place to hang it, on my already pretty odd apartment door. I think I learned a little lesson about not getting too hung up on the end result and just making things because I want to.